Much as we thought we had found out everything we needed to know about the site we bought in Co Down, there were still plenty of surprises along the way, writes self-builder Brian Corry who’s building the dream eco house.
In his building the dream series, Brian chats about:
- How to save money by going DIY
- How to manage the project yourself
- How to work with an architectural designer for the design
- How to design around the site
- Why he chose to go with a passive house specification and how
- Full details on heating, hot water and ventilation system (in his case, all in one) plus full insulation and airtightness spec
- Kitchen design and choice of windows and doors, plus external finishes
- How to get the look on a budget with clever sourcing
- Full floor plans and specifications
Contents
Part 1 – Design to a budget – Skip to Part 1
Part 2 – External finishes – Skip to Part 2
Part 3 – Heating, hot water and ventilation – Skip to Part 3
Part 4 – Insulation and airtightness – Skip to Part 4
Part 5 – Kitchen design – Skip to Part 5
Part 6 – Building services – Skip to Part 6
Part 7 – Windows and doors – Skip to Part 7
Part 8 – Design tailored to the site – Skip to Part 8
Part 1 – Design to a budget
As published in the Spring 2021 edition of Selfbuild magazine.
Our self-build journey started as it often does, house hunting. My wife, Karen, and I had been looking for some time but none of the houses we visited delivered what we were looking for, and Karen eventually said she was surprised I hadn’t suggested a self-build considering that we wanted a house that worked with the landscape, was ecologically friendly and low carbon.
Several months later we found the dream site which had an old single storey cottage with outline planning permission. It had a long windy, narrow, lane and a magical stream running down the back of the property overlooking a small Lough. Just perfect.

Working with an architectural designer
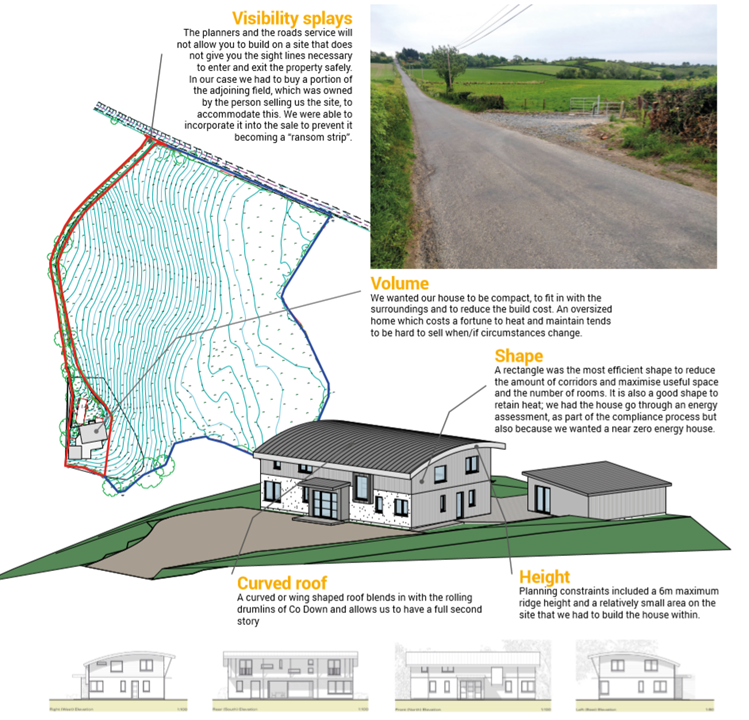
Over a number of months, we played around with various layouts and shapes on paper but none seemed to work efficiently as a home until we settled on a rectangular design with a curved roof.
When we went to our architectural designer, we were able to give him our detailed layout. Even though this saved time, there was still plenty to do and this is when you get see the designer’s skill and experience in drawing up the plans. That fresh perspective and knowledge made our designs even better.
If we hadn’t already known exactly what we wanted, then we would have undoubtedly asked for initial sketches from a number of architectural designers and proceeded with the one we liked the most.
As it was, we employed an architect we knew and are happy with how the design turned out and with the suggestions he made. We also knew our architect had a good rapport with the planners and he was able to guide us through gaining planning permission with no hiccups.
Working with a QS
Spending so much money before we even broke ground led us to try and cost absolutely everything in the build. In hindsight, we should have employed a quantity surveyor (QS) from the very beginning instead of several months later. However, it proved a very useful exercise to try to cost everything ourselves as it forced us to research and make decisions on bathroom fittings, the kitchen, floor coverings, lighting, etc.
What was most difficult was trying to work out the rates for the various trades and what time should be allocated for, say, plastering. This is where a QS comes into their own. They have up to date rates and know pretty accurately how long a job should take.
Knowing this is essential when you start to employ people directly to undertake work – how else will you know that you are not overpaying or whether the cheapest quote you received is actually too low to be realistic?
Undoubtedly, having a QS does not remove all financial risk from a project however there is no hiding place when they do the sums and if you have been over optimistic then your QS should put you right. With the information they provide you should recoup their fee many times over, both in time and money. To give you an example, our quantity surveyor gave us a breakdown of the preliminary costs: £725 for a temporary water connection, about £1,500 for the site office, accommodation and portaloo, and in excess of £3,500 for lifting equipment and generator. The scaffolding hire for 300sqm for a period of 20 weeks, will come in at close to £5,500, and fuel, transport, site security and insurance also have to be factored in at this early stage, along with cleaning and tidying the site daily. Then of course there is the management, staffing and contracts manager, plus professional fees (QS, architect, engineer, energy assessor, solicitor).
Added costs
Demolition – Anyone who has watched even a couple of episodes of Grand Designs will know that the road to self-building is strewn with over optimistic budgets. Our first reality check was the demolition and clearing of the massively overgrown, sloping site. It was only when we had cleared the vegetation that we realised we needed to cut and fill large sections to create a relatively flat area for the build. An extra couple of days of digger work plus the stoning suddenly doubled the actual budget allocated.
Laneway gravel – That nice long laneway I mentioned at the start in reality cost a small fortune in stone to make it suitable for lorries to access. This was something we definitely hadn’t budgeted for. Even after we had demolished the existing structure many tonnes of stone was needed to ensure the site was clean for vehicles to park on. £10K disappeared quick as a flash – ouch.
Electricity connection – We had made an allowance of £20,000 for bringing electricity to the site but the reality is that you need to place a firm order and pay a deposit before a proper survey is undertaken. It took months of planning, speaking to neighbours and pouring over Google maps to find a suitable route that everyone would be happy with – at a cost of £21,000 for the connection and approximately £3,000 for us to organise digging the trench.
Part 2 – External finishes
As published in the Summer 2021 edition of Selfbuild magazine.
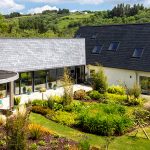
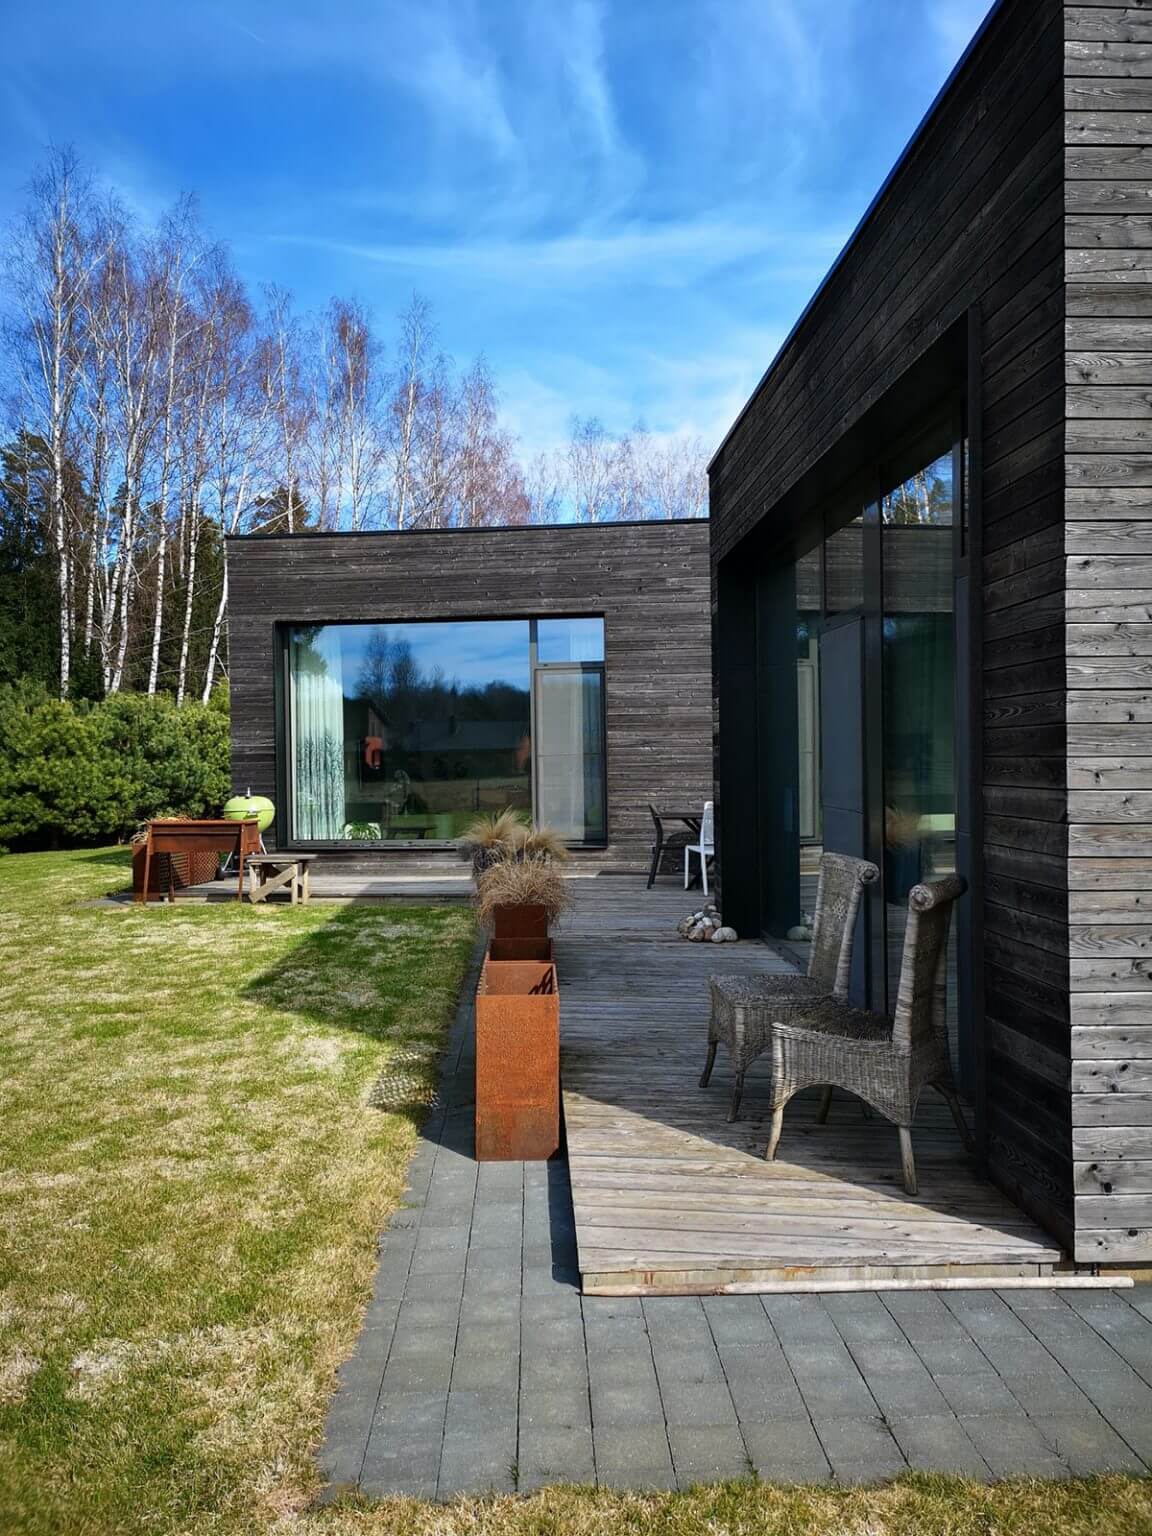
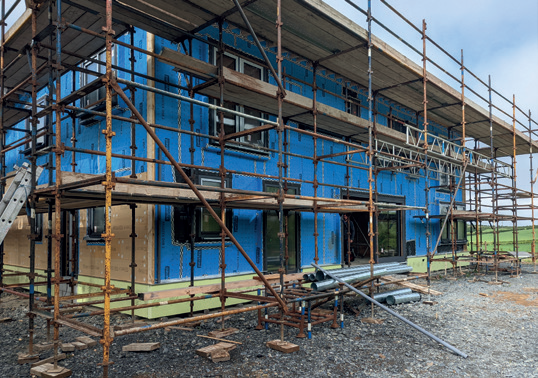
Having a storm proof roof and external façade is a necessity in Ireland but my wife Karen and I, like most people I think, were more focused on the aesthetics and ensuring that our house blended in to its surroundings, writes self-builder Brian Corry who is on a mission to build himself an eco house.
The West Coast of Scotland is a beautiful place to sail, and in August 2019 I was with some friends on their boat when the forecast of an impending storm came in. We very quickly decided that lying at anchor or sailing through it would not be wise so we made our way to Croabh Haven marina on the Mull of Kintyre to see Storm Ellen out.
Now there isn’t a lot to do on a boat in a marina in the middle of a storm so I decided to go for a run, over the hills to the bay on the other side of us where there was another marina. The weather was horrendous with torrential rain but as I descended into Ardfern, a recently built home with timber cladding caught my eye.
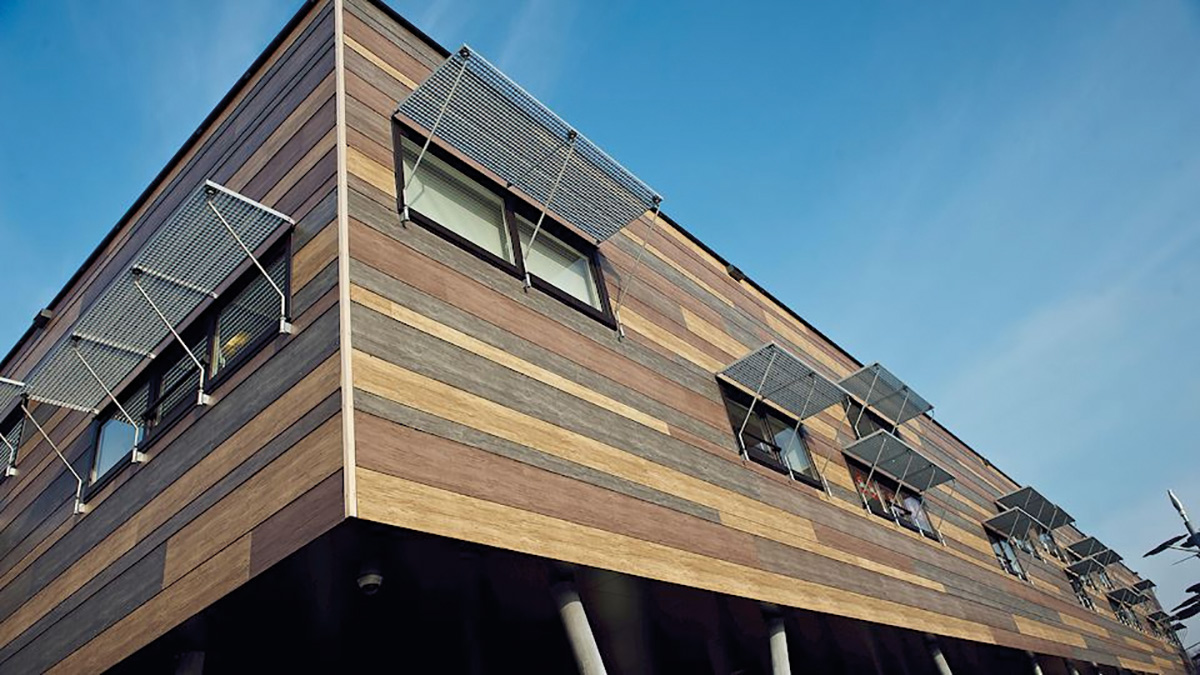
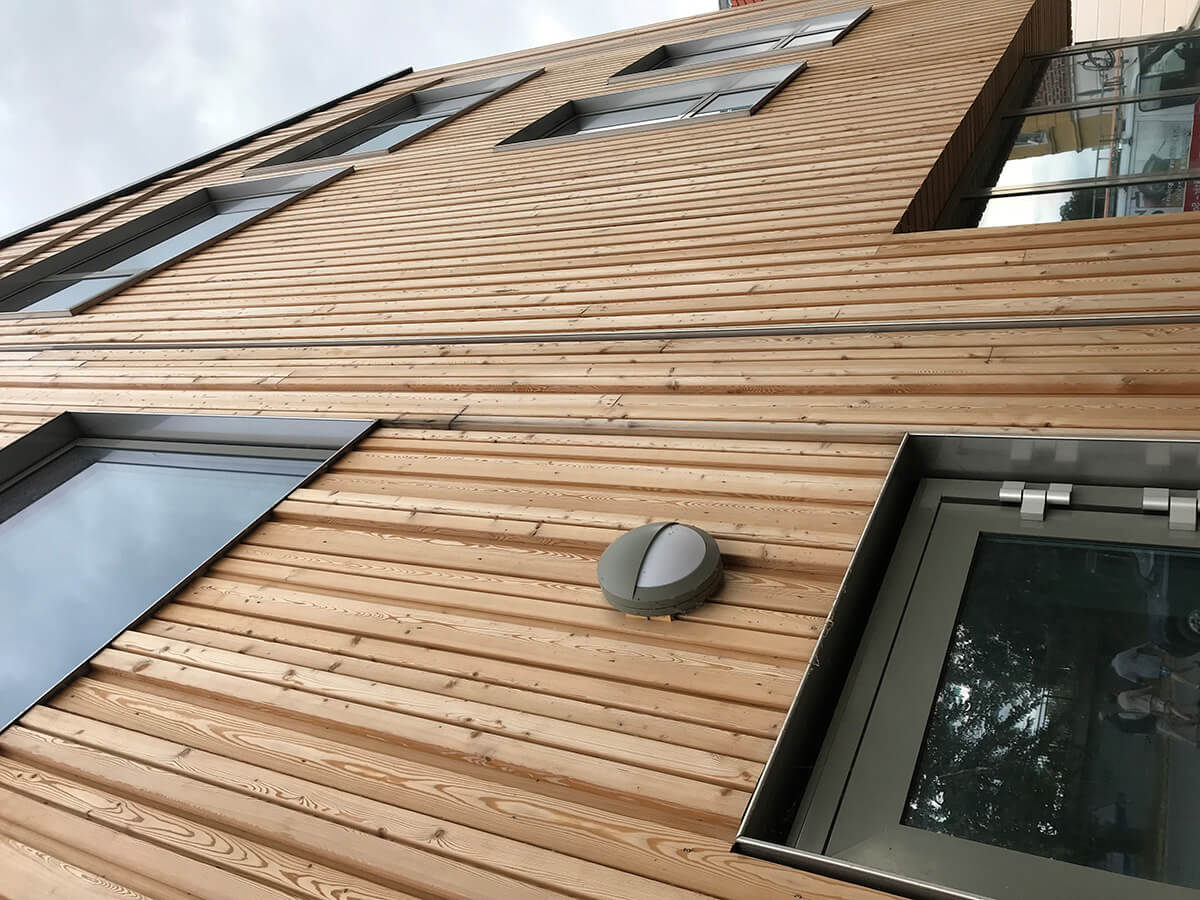
Siberian larch
Karen and I had been scouring the web looking at different façades – we had ordered all sorts of samples but we couldn’t find one we liked. We liked the look of cedar cladding but were concerned about how it would weather and while there were some fine composite timber effect boards, we just didn’t feel that the colour was natural enough.
Similarly there were some plastic wood effect boards which in small areas looked fine but we didn’t think it would be successful over a larger area.
It was here, in the midst of a storm, that I found something that could work on our house. I knocked on the door, dripping in my shorts and running jacket to ask what type of wood they had used and where they had sourced it.
They kindly let me stand just inside the door whilst they wrote down the details of the Siberian Larch for me and I thanked them and left them a large puddle where I had waited.
Karen and looked up the suppliers’ website and found lots of images that really impressed us. What we couldn’t decide upon was how much to use. Karen quite liked the idea of having part of the house rendered and she felt that if the whole house was clad in larch that it might look a bit heavy and dull or too much like a barn.
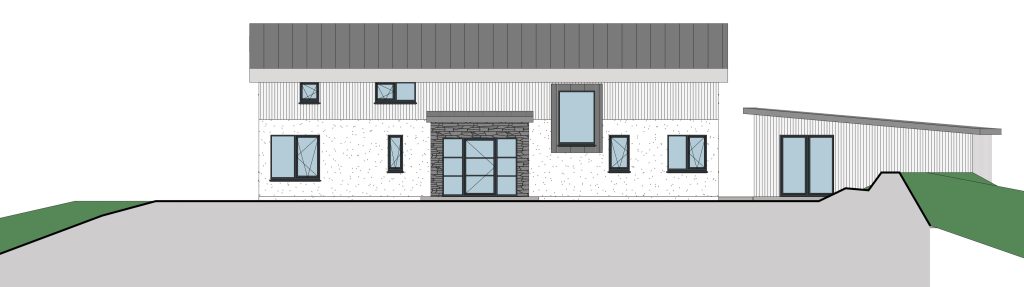
We consulted our architect and he suggested half and half for the front of the house, full larch cladding on the sides and the back fully rendered. When the computer simulation was created, it seemed a good balance.
This was after we had requested planning permission but we had left the actual material choice vague on the application.
I subsequently made enquiries with the Scottish supplier but soon found that the cost and especially the shipping was quite high – the wood itself was coming in at close to £10K, with the secret fixings at £2.5K and the delivery at £1.5K. At £14K plus VAT it was well over budget.
Shortly after, I happened to pass a stand at Selfbuild Live Belfast and they showed me samples of some very nice Siberian larch. Machined in eastern Europe, it had very few knots and was also significantly more economical as it was sawn in a rhombus shape, which removed the need to overlap the timbers, thereby significantly reducing the quantity required.
Zinc alternatives
The decision for the roof covering was another difficult one. Our roof is a low angle curve making it unsuitable for traditional slates or tiles. We loved the look of zinc standing seam having seen countless of examples in magazines and whilst out driving. We also felt it would work really well in our rural location, however cost was a major issue given how large our curved roof was with all the overhangs.
At the beginning I had asked for a price per square meter from a local supplier and used this as a basis for my budget which came out at approximately £100 per square metre. Naively, when setting the budget, I hadn’t factored in the build-up materials required underneath the zinc nor all the trimmings and guttering which proved to be a significant extra cost.
The end result was that when I priced the roof properly it came back 50 per cent more than I had allowed for.
We began to look at alternatives and came across an PVC product at SelfBuild Live Belfast that provided a very similar look but was much more economical.
We looked carefully at the guarantees and warranties and were happy that the product would not fade and would last as long as we needed it to. Compared to zinc, it came in about half price. This however isn’t the final word on the issue as we are also currently looking at a corrugated fibre cement profiled roofing sheet as an alternative. Decisions, decisions…

Landscaping
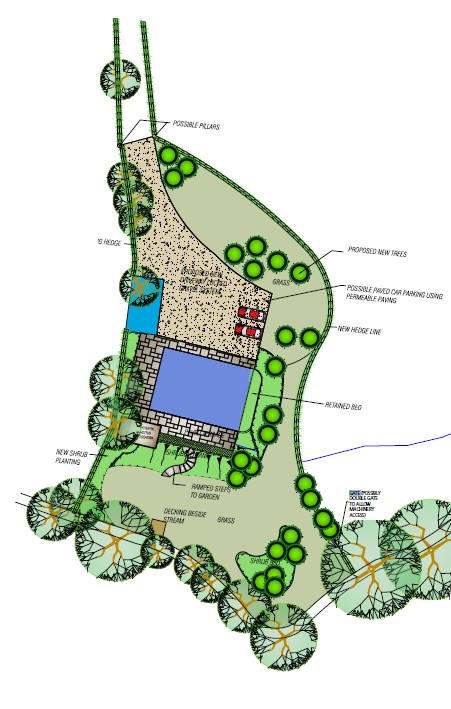
When is the best time to plant a tree? The answer is 20 years ago, but the next best time is today! Planting a lot of trees was high up on the priority list, for both privacy and the desire to create a woodland within our eight acre field.
We planted whips in areas away from the site before starting any other work so that they would have the chance to grow as the project proceeded. This was accomplished with the help of a landscape architect who drew up a planting schedule according to our wishes and helped us specify the right types of tree species.
The hard landscaping planned for around the house was fairly straightforward as we wanted a patio at the rear and a reasonably sized garden.
There was a lively debate between Karen and I over how big the garden should be. I wanted to keep it relatively compact but Karen had visions of a large, well trimmed lawn. Because Karen gets hay fever from cut grass it would be up to me to do the cutting.
In my teenage years I spent countless hours cutting the grass of my parents’ large garden and I had no desire to repeat this. We did of course come to an amicable compromise!
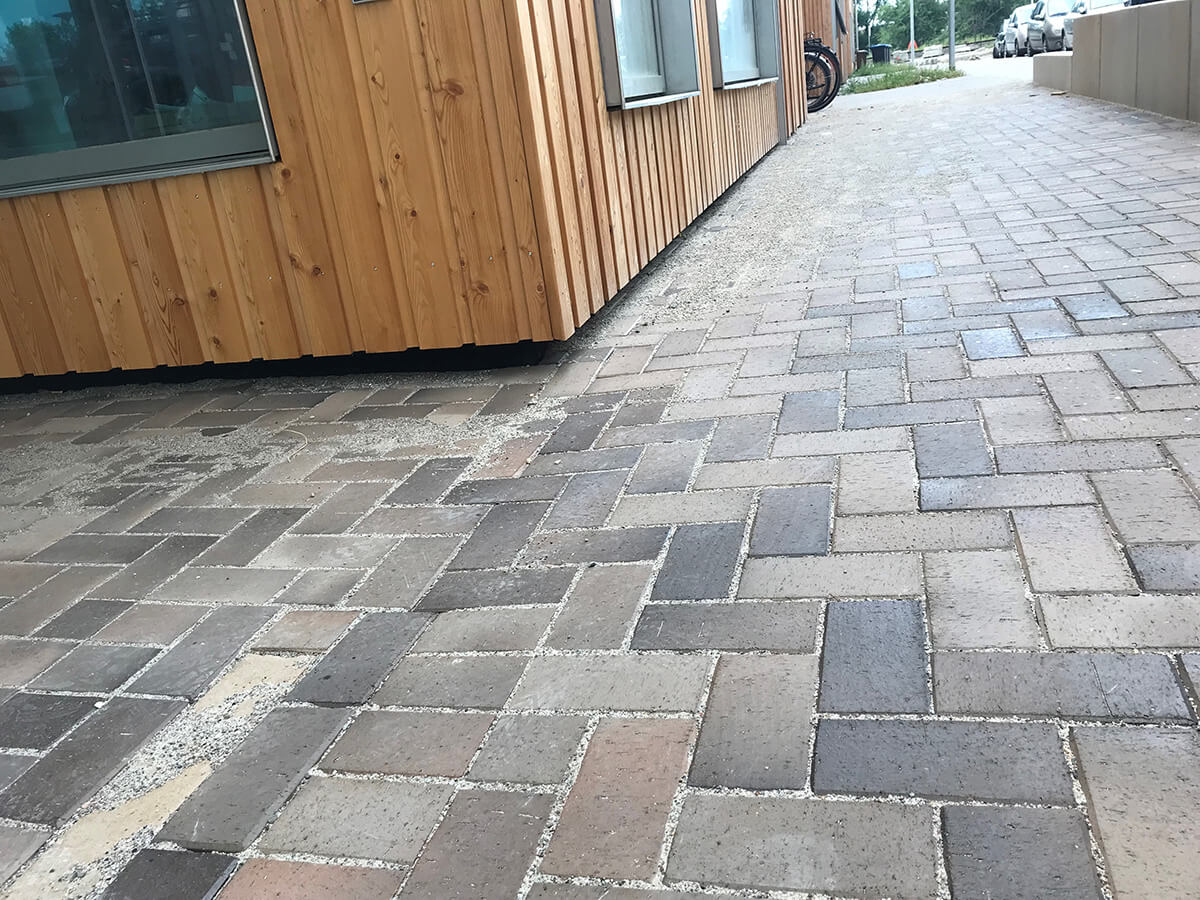
For the driveway and parking area at the front of the house we decided on a mixture of tarmac drive and then a gravel area held together in a plastic grid system, allowing for the water the drain while keeping the gravel in place.
ADDITIONAL INFORMATION
Siberian larch, rhombus cut: iDomus, idomus.ie
PVC roof covering: Alkorplan by Renolit, renolit.com
Part 3 – Heating, hot water and ventilation
As published in the Summer 2021 edition of Selfbuild magazine.
Choosing between the myriad of options for heating, hot water and ventilation is confusing at best. Self-builder Brian Corry, who’s on a mission to build an eco house, explains that is precisely why he relied on professional advice to come to a decision. In the end, he and his wife Karen chose an innovative system that combines all three.
Reality very quickly sets in once you have been granted planning permission to build your dream home. Chief among the most complex decisions Karen and I had to make early on, was how to heat our home, supply it with hot water and ventilate it correctly.
In the past, it was relatively straightforward to heat your home with a large, oil guzzling boiler and large radiators in every room – controlled by a simple on/off timer that never knew how warm or cold the house was (there certainly were no thermostats).
The house wouldn’t have been built with high levels of insulation and natural ventilation would have been the preferred method of injecting fresh air. This was done by boring four inch holes through the walls (typical in ROI) or having windows with integrated trickle vents (more typical in NI) causing your curtains to shift on a windy day.
A fireplace or two came in handy for the colder days and nights, as long as it was fed a steady stream of coal or turf. Not exactly good for the environment, your lungs or your pocket!
Ever stricter building regulations, especially in ROI (and soon to be in NI), have forced self-builders to think carefully about their choices, and in many ways have limited their options.
As with the motto, Reduce, Reuse, Recycle, the best kind of energy in the home is the one you don’t need in the first place. In building design this is called the “fabric first” approach. In other words, maximise the energy efficiency of the house before you even look at what you need to heat it.
Even though we are building in NI and didn’t have to go down this route, we chose to heavily invest in insulation and airtightness to minimise the amount of heat we would need. The fabric first approach is a well proven method.
My parents, for example, built a house back in 2012 that was near Passive House standard, which is a low energy building methodology that focuses on the fabric first. They didn’t quite have the confidence at the time to do away with radiators in every room, just in case, however in nine years they have never once been used.
Ventilation
Given the level of airtightness we plan to achieve, we knew we would go for a mechanised ventilation system to ensure a steady stream of filtered, fresh air. The most efficient system we came across was mechanical ventilation with heat recovery (MVHR) so that was on our must have list from the start.
Researching suppliers, we found a heat recovery ventilation company that offered a system that combined ventilation with heating (see next section).
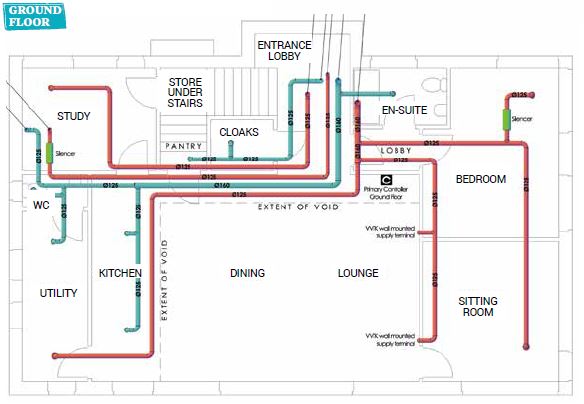
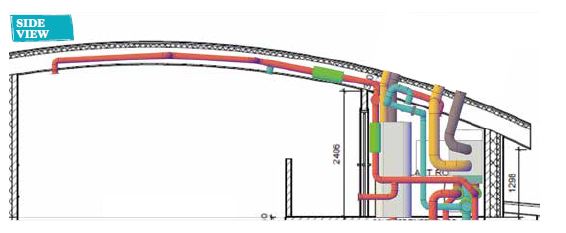
Of huge importance is designing and sizing the MVHR correctly to the specific layout of your home and the necessity to do so at the early design drawing stage so that ducts can be accommodated and hidden in the walls, ceilings and voids before the layout is finalised.
If we had tried to do this at a later stage, it would have been a complete nightmare and led to costly and unsightly compromises. For example, the MVHR contractor found early on that we had left too little space in the plant room to actually fit the unit into. It was then dead easy to make the room 300mm wider and the next door bathroom 300mm smaller.
This is not something you would notice when built, but would have been a costly error if we had discovered it too late. Similarly, the freedom to plan the duct routes will lead to a cheaper install with fewer ducts, less bends and a more free flowing, quiet and efficient system.
Space heating and hot water
Working out the heat load requirement to heat the home was done as soon as we had our specifications finalised for the floor, wall and roof build up. This step definitely requires an expert. After all, you wouldn’t dream of ordering a structural beam without first employing a structural engineer and the same goes for working out the heat loss calculations for each room.
Such granular detail is necessary given that the orientation of each room (e.g. North facing) and the amount of glass (solar gain, less thermal performance than a wall, etc.) will each have an effect on the amount of heat required to heat it to a comfortable level.
We paid for a professional to work out the calculations and it turned out that the heat load for each room was really very small. So small, in fact, that installing a house wide heating system would have been a complete waste of money.
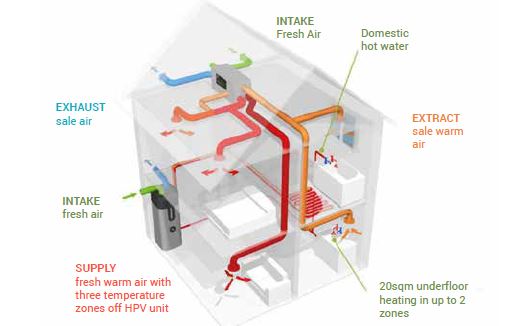
Instead, we looked at a system that would provide heating, hot water and mechanical heat recovery ventilation all in one, using an air to air heat pump as the primary source of heat generation.

The system was able to provide the small amount of heat we needed by warming the incoming fresh air and using the MVHR ducts to deliver it to each room. In addition, this system can heat a 300 litre unvented hot water cylinder with an electric immersion as back up.
This hot water cylinder has a third coil that can be connected to a solar thermal panel. However, our intention for the future is to install photovoltaics (PV) and battery storage to reduce the electricity usage of the heat pump.
We have some electric heated towel rails in the bathrooms, and a small area of electrical underfloor heating in front of the large windows in the kitchen and living area. These will be sufficient to cope with the coldest of days. We have all heat emitters integrated into the main heating controls.
Choosing this as our heating system meant we had to configure our ventilation ducts so that they would correspond to our heating zones. We have three heating zones, and therefore three sets of ductwork that feed back to the central ventilation unit; each of the three zones are then laid out in a tee’d configuration.
Cooling
Overheating can be a problem in many well insulated homes, particularly in south facing and heavily glazed rooms. The solid timber build method we chose helps regulate the temperature inside, as it does not heat up or cool down quickly.
However, we do have a large south facing glazed area, so we will be adding a brise soleil to provide shading. Our hybrid heating and ventilation system will also be set up so it can provide up to five degrees of cooling for hot summer days, by running the heat pump in reverse.
This cooling function comes at an additional cost but worth it, considering we didn’t have to invest in a standalone heating system and heat emitters. Then again, if the brise soleil does its job, the cooling mode may turn out to be used just as much as my parents’ radiators. Only time will tell.
The bottom line
The overriding lesson throughout our journey was to work out what we wanted or needed as early as possible and have these details fed directly into the architect’s drawings.
Very few architectural designers have the skills and knowledge to provide this specialist advice to self-builders, but thankfully we found that any heating and energy efficiency consultants we came across were well practised working with them.
Making changes at the design stage saves a huge amount of redrawing and costly changes later on in the process. Every change has a knock on effect; some can be minor but others require entire areas to be redesigned.
Remember, professional input is critical in narrowing down the bewildering number of options available to you. Otherwise, you may find yourself quickly disappearing down a multitude of rabbit holes.
Part 4 – Insulation and airtightness
As published in the Autumn 2021 edition of Selfbuild magazine.
Our choice of insulation products, and our airtightness strategy, were based on our build method and our desire to pre-empt any mishaps on site, writes self-builder Brian Corry who’s on a mission to build himself an eco house in Co Down.
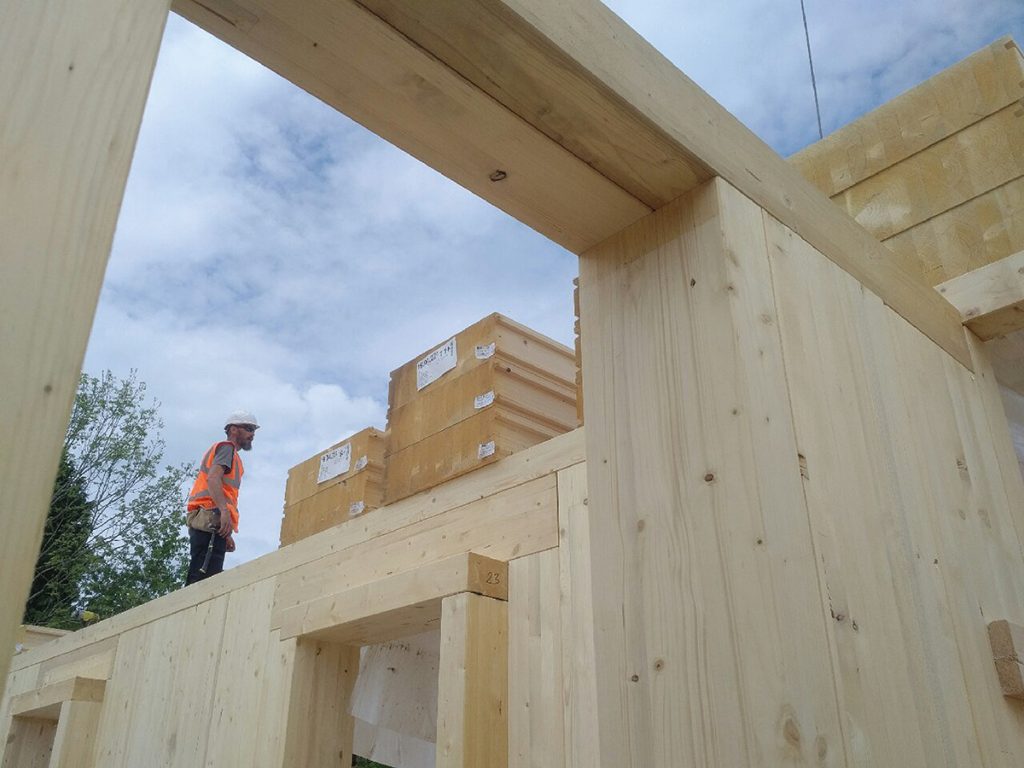
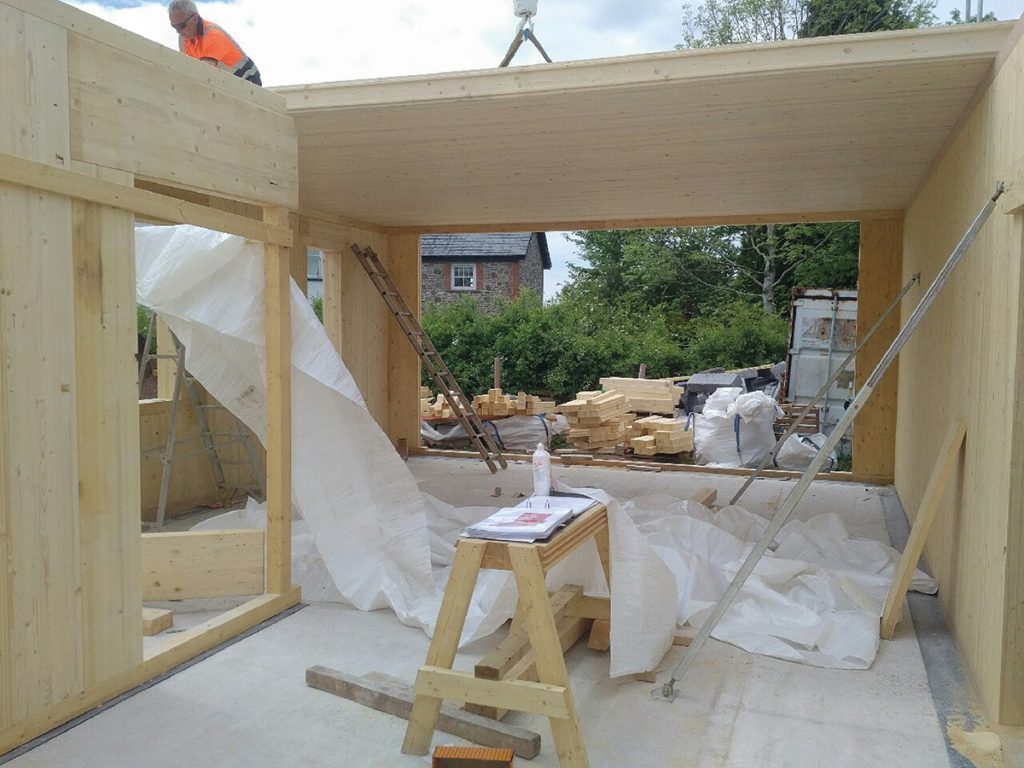
In my article in the Spring edition, I explained why we had chosen a single skin glulam timber structure as our build method. One reason was because it allowed moisture to escape.
So when it came to choosing how to insulate the structure, there would have been little point choosing an insulation product that would lead to interstitial condensation between the wood structure and the insulation.
I am sure you know what would happen if you tried to make toast in a microwave – you’d end up with a soggy lump of bread because the steam cannot escape!
Insulation
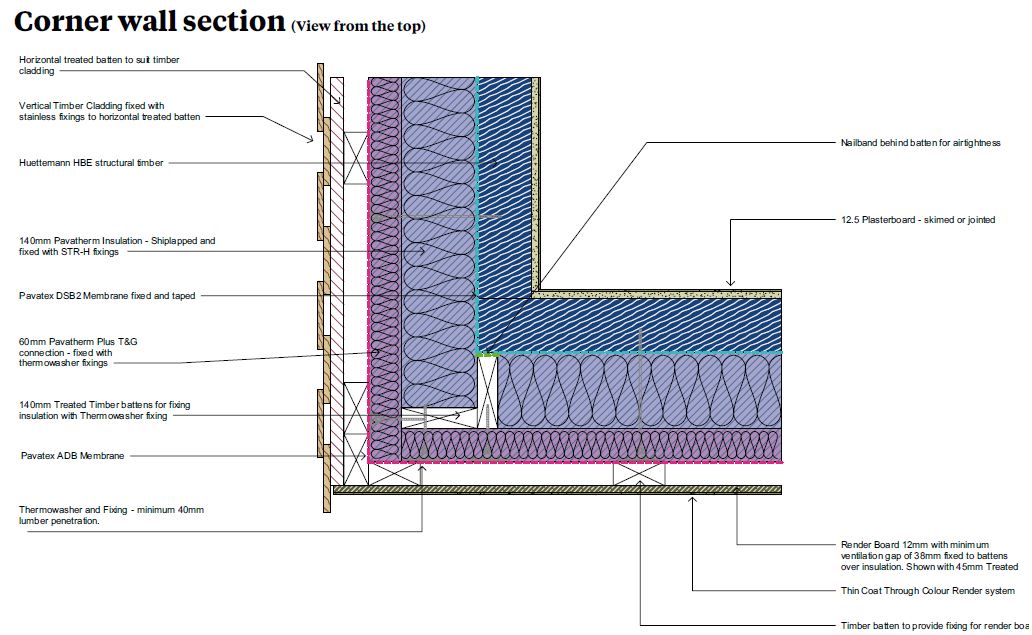
The single skin glulam walls are 100mm thick so the insulation needs to be fixed externally as a board, although it is possible to insulate internally too. This limited our options somewhat, as it ruled out all cavity fill products.
The obvious choice was wood fibre insulation. Not only is it a pretty good insulator, it is also carbon neutral and some manufacturers even claim carbon negative. So it is in good company with the glulam walls.
To meet our target wall U-value of 0.16 W/sqmK we needed 200mm of wood fibre insulation fixed externally in addition to the insulation provided naturally by the glulam walls themselves. Similarly, the roof will be insulated to achieve 0.14 W/sqmK with wood fibre, which means that the house should be as warm as toast.
For the floor we took a different tack because our primary concern here was to ensure that there would be no cold bridging, as well as achieving a U-value of 0.15 W/sqmK. Vapour permeability was not a consideration, so we had a lot more options available to us.
In the end we made the decision to go for a precast insulated (EPS) concrete flooring system for ease of installation with the minimum chance of errors that could lead to unintended thermal bridges or gaps, and confidence that it will meet our thermal target.
Airtightness
Despite specifying the correct amount of insulation, it could be largely wasted if we did not ensure that the house was airtight and free from draughts.
The HBE glulam we chose is a tongue and groove system and naturally offers significant airtightness in itself however we still need an airtight, yet vapour permeable membrane, to envelop the walls and roof. We will do this by sandwiching an airtight membrane between the insulation and the external face of the HBE glulam walls.
The insulation effectively pins the membrane to the wall and similarly on the roof. Our cladding then attaches to timber battens that are themselves screwed back to the glulam wall with a further membrane to protect the external face of the insulation should any water get past the cladding.
Whilst every effort has been made to maximise the vapour permeability of the structure, it still requires Mechanical Heat Recovery Ventilation to ensure that the air is kept fresh, and the moisture generated from bathrooms and the kitchen is removed efficiently.
“Whilst every effort has been made to maximise the vapour permeability of the structure, it still requires Mechanical Heat Recovery Ventilation…”
Site proof
Having a plan is one thing, making sure it survives contact with joiners, electricians and all the other trades is another.
The placement of the membrane between the external wall of the structure and the insulation will mean that it will be pretty much inaccessible to most trades. Indeed, they would need to drill a long way to hit it!
In addition, we have dedicated ducts to bring in all the cables and pipes so there is no need for anyone to drill a hole through any part of the structure.
The trades will be pretty much able to nail, screw and drill to their heart’s content inside without fear of accidentally piercing the membrane. Having said that, I still intend to brief everyone thoroughly so that they are aware of the situation.
Part 5 – Kitchen design
As published in the Winter 2021 edition of Selfbuild magazine.
It made sense to design our house around the kitchen, simply because we will spend so much of our time in it, writes self-builder Brian Corry who’s on a mission to build himself an eco house in Co Down.
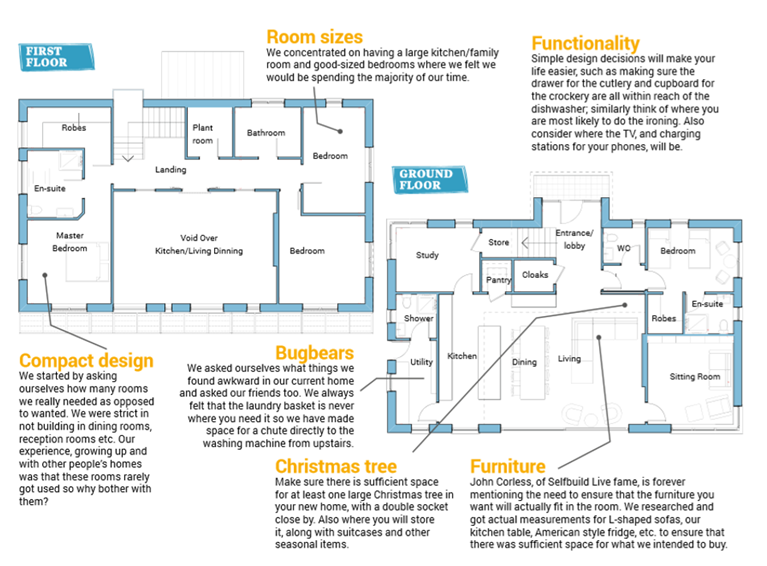
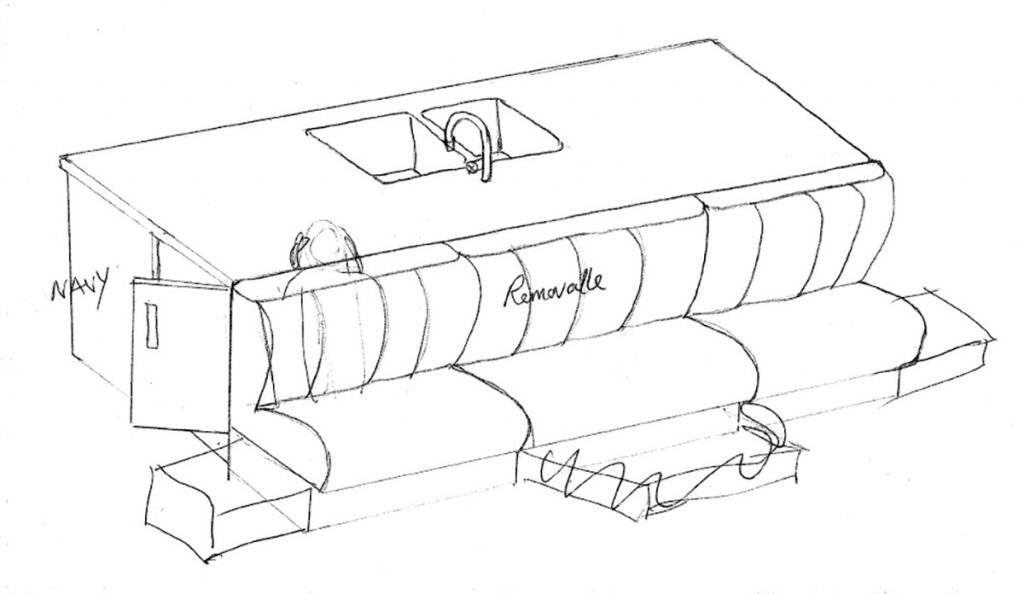
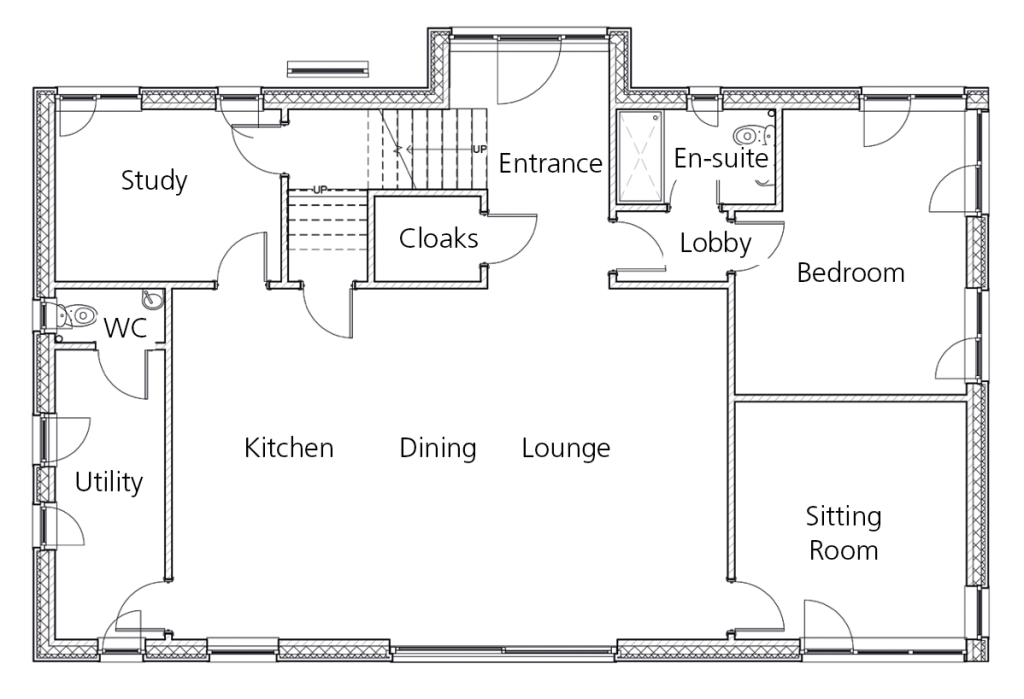
My wife Karen and I started thinking about the kitchen during the initial design phase, when we were doing up the floor plans with our architect. This is when we came up with our basic kitchen configuration: one side wall for the units and a large island to host everything else.
As we were starting with a blank canvas, our focus was to make the kitchen easy to use. Everything will happen in this room, from entertaining, to family meals, homework supervision and relaxation.
Method and budget
Budget wise, we were fairly constrained but luckily neither of us had a burning desire to have something hand made from rare imported timber! We felt we could achieve the style and look we wanted, within budget, by buying directly from manufacturers and getting a skilled joiner to put the kitchen together.
Eric Black, who is a builder and joiner by trade, is the person who is going to build the kitchen (and help build the house) for us.
We started the design process by taking all of our pet peeves and sketching out a rough drawing of how to avoid them. In our current kitchen we are constantly bumping into one another and fighting for space as there is just one corner where you can actually do anything. This is just one example of dozens of things that we would love to change as it is laid out so poorly.
Then we drove down to Eric’s home in Co Tyrone for a cup of tea and to go through our ideas with him. He produced these sketches as a result of our chat.
The total cost for the kitchen should be about £10K including appliances, and factoring in Eric’s labour. We arrived at this figure after Eric brought us to visit a manufacturer in Cookstown. There we looked at all the different options for the surfaces, doors and handles, and picked what we wanted.
Form and function
We have a young family so being able to keep an eye on them whilst still doing the cooking and chores was foremost in our thoughts. We wanted a seamless transition from kitchen on one side, to comfy living room on the other, with a large dining table in between.
Early on Karen and I decided that we wanted a big island for food preparation. By having the food prep on the island it is open on two sides and there is plenty of space for people to move around each other.
Having an integrated food waste bin close at hand, in a pull out drawer, will also be very helpful as we currently lift ours out from under the sink about 10 times a day. And that’s just for cups of tea!
After that we opted for the kitchen triangle arrangement, with the placement of the sink, fridge and cooker within reach of one another, and then expanded on it by placing the appliances in the most suitable places.
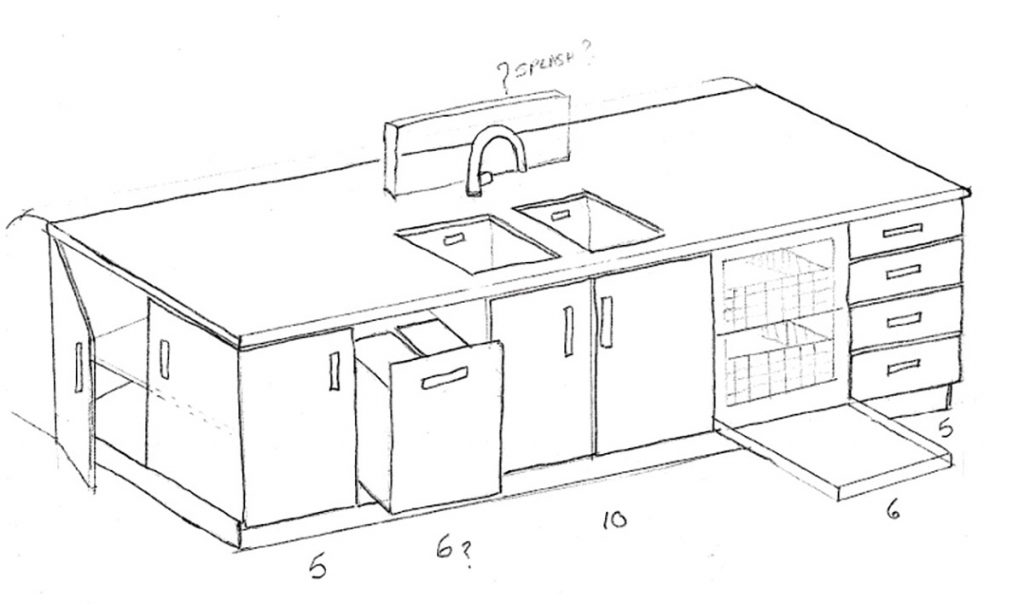
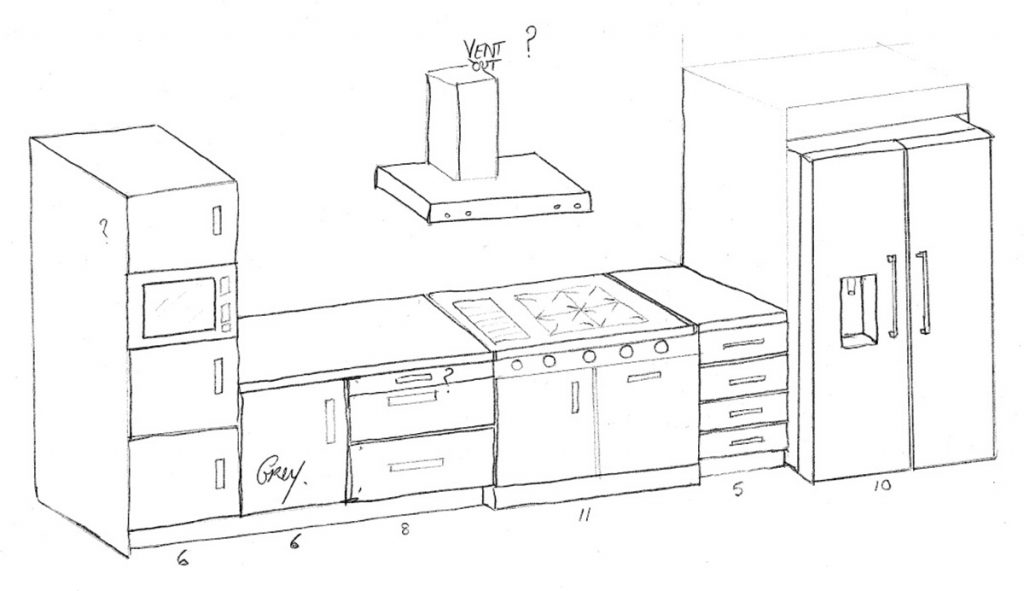
For example, we had the dishwasher placed beside the sink (where stacks of plates will accumulate) so that the least amount of movement would be needed to fill it. Similarly we wanted a nice big fridge and freezer so that everything would be easily accessible to the prep area on the island.
We also thought about where we will store the plates and crockery, from the point of view of accessing them to set the table, as well as putting them away after being washed.
The ovens and microwaves, meanwhile, will be in a single stack at waist to eye level height to keep small hands and fingers from getting burnt. Another advantage is that we won’t have to bend down to see if the turkey is burning.
Last but not least, we are definitely going to be using drawers for everything. With cupboards, you lose things at the back and only what’s stored at the front is really accessible.
Passive house constraints
Finally, nothing is ever straightforward when building a near passive house. The cooker hood cannot have an external vent as otherwise it would compromise the airtightness.
Instead, we will use a hood with a charcoal filter. We will also have a ventilation inlet close by, from the mechanical ventilation system with heat recovery, to hoover up any steam and moist air.
Also the cooker you see in the sketches is not a range cooker – the heat it produces would put you out of the house given the amount of insulation we have. Instead, we have chosen an induction hob that gives off very little heat.
Part 6 – Building services
As published in the Spring 2022 edition of Selfbuild magazine.
We had to finalise our bathroom design and layout before we had the foundations poured, writes self-builder Brian Corry who’s on a mission to build himself an eco house in Co Down.
My wife Karen and I didn’t think sorting the bathrooms would be particularly taxing. We expected all we would have to do was visit the bathroom stands at Selfbuild Live to see what we liked, then go to a few showrooms to choose the pieces that fell within our budget.
However, nothing is ever quite that simple and I found out soon enough that our choice and positioning of sanitaryware would have a knock on effect on many other aspects of our build. Some people just trust their plumber and builder to deal with the consequences of their decisions, but we were keen to take control.
Approach
Right at the start we planned our bathrooms on the ground and first floors to be roughly on top of one another. Our reasoning was that it would make it easier to supply hot and cold water and deal with the waste pipes.
We also knew it was important to choose our sanitaryware and fixtures well in advance, to avoid any alterations on site. For example, you wouldn’t automatically think about your floor screed when choosing your shower tray but you need to if you want it to sit flush.
We had to find the exact shower tray we wanted so as to make sure we had the drains in the right place, and to make sure we left a void in the screed for the tray to slot into. If we hadn’t, we would have had to ask our builder to chip out a void in the screed floor – a floor that was poured just a few months ago.
Hidden pipes
Plumbers are in the habit of running the waste pipes externally, but we knew we didn’t want a whole load of ugly pipes ruining the external appearance of our new home. We also knew that because we were building an eco house, we had to minimise the number things that had to go through the wall to help maintain airtightness and thermal performance.
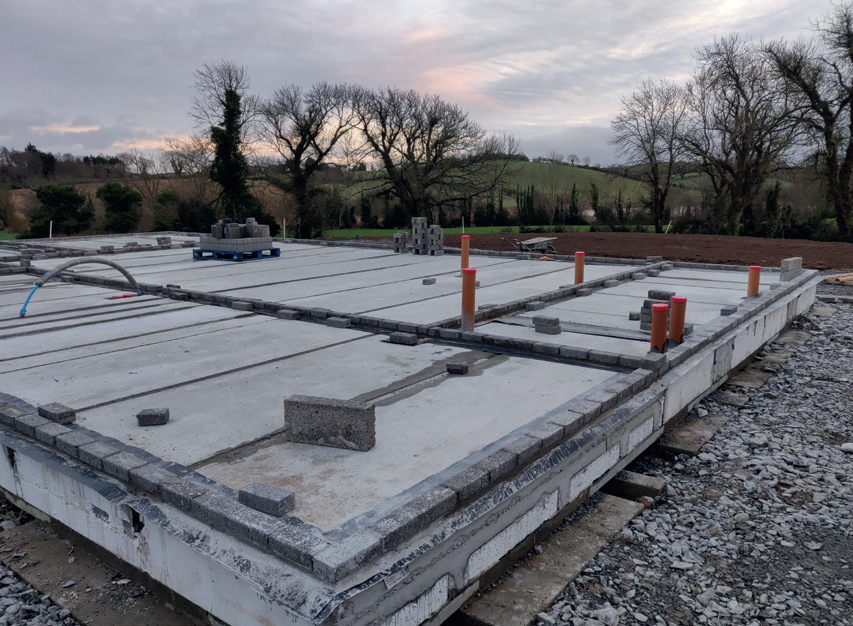
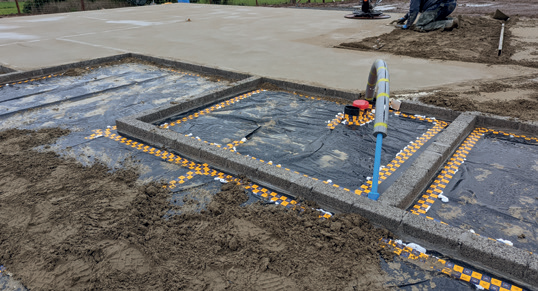
We are therefore directing all the wastewater down and through the side of the insulated foundations, keeping the pipework completely hidden.
To achieve this, we had to know the exact location of these pipes when laying the foundations and subfloor. This is because the holes are cut through the slabs during manufacturing, and you can’t change your mind after it’s done.
When our contractor was stoning the pipes in, he offered to move the pipes to line them up with the wcs, which is standard practice. I had to explain that they were offset because of our air admittance valve system (see below). Thank goodness he asked first!
Soil vent pipe alternative
When a toilet is flushed, a siphon effect is caused and you need an external vent to stop the water in the traps in the bath, sink and basins being sucked out leading to foul smells in the room.
Soil vent pipes can be a real pain to position as they have to be away from any windows and often it means they need to terminate well above the eaves to ensure bad smells do not get drawn into the house. As everyone knows, they don’t always work.
The alternative is an air admittance valve that opens when negative pressure builds up and, crucially, only allows air to go one way – preventing foul smells from getting into the room and removing the need for a soil vent pipe.
Hot water
Instant hot water is a dream for anyone standing in the bathroom on a cold winter’s morning. It’s both frustrating and hugely wasteful to let the water running for ages whilst you wait for the hot water to reach your tap from the cylinder or boiler. To add insult to injury, you often only ever need a small amount in order to wash your face or hands.
There are two parts to solving this problem. The first is to ensure your pipe runs are as short as possible. Right at the beginning we put our hot cylinder in the middle of the house, adjacent to the upstairs bathroom and roughly above the main downstairs bathroom.
Both the ensuite bathroom and the kitchen taps are near one another, so we’ve kept those distances as short as possible too.
The second part of the solution was to source a highly insulated pipe which will keep the hot water hot, and the cold water cool. I came across a preinsulated pipe at the Cork Selfbuild show and was impressed by how well it can maintain the temperature.
The proof of the pudding is in the eating so until we actually get it installed and running, we won’t know how well it has worked. But the alternative would be to install an expensive pump to constantly circulate the water in a loop, which is not really a practical option for a single house our size.
Recycled water
Treating water to make it drinkable is expensive, yet most of us have no real alternative but to use it to flush toilets and water our plants and garden.
The Energy Saving Trust found that toilet flushing was accountable for 22 per cent of all household water use in the UK. And because of a leaky network of pipes, and little to no water recycling, Irish Water plans to divert some of the River Shannon to Dublin. It’s all very wasteful.
For budget reasons we haven’t planned to install a rainwater harvesting system from the get go, but we are putting in the pipe infrastructure internally and externally to allow us to do this as soon as we can afford it.
We will bring an extra uninsulated water pipe to each toilet cistern and route the roof rainwater drains through an area where we can place a rainwater harvesting unit. This will make future installation very easy as we won’t have to lay any new ducts.
Fitting out
We are grateful our architect took the time to insert real sized footprints for the shower and baths during the design stage, to ensure that we could fit everything in.
Then we did visit lots of bathroom stands at the Selfbuild Live events and then toured the showrooms to get an idea as to what was available within our budget. We decided to keep things relatively simple to keep the costs down, but that was easier said than done.
The options available now are endless and indeed, so are the prices. It turned out our biggest splurges were the basins, and the tiles to add colour and style. Thankfully, Karen is in charge of this area.
Anecdotally, Karen had always wanted a rolltop (curved ends) standalone bath and we had duly scouted out a few options. It so happened that before we placed the order we stayed over at a friend’s house and got to try one out as we were bathing our nine month old son. Our backs were wrecked afterwards because the sides were so high. So we decided to go for a more modern, back saving, style instead.
Part 7 – Let there be light
As published in the Summer 2022 edition of Selfbuild magazine.
The windows choice for us felt like a really important decision, seeing how it would massively affect the look of the house. Not to mention the fact that it was also key to the thermal performance of our passive home.
Anyone building their home will have windows on top, or near the top, of their shopping list – it’s a core element of any home. My wife Karen and I were no exception.
Considering the myriad of options and the fact that we knew glazing was going to be one of the biggest single item expenditures we were going to make, choosing the right style, let alone the right supplier, was a daunting task.
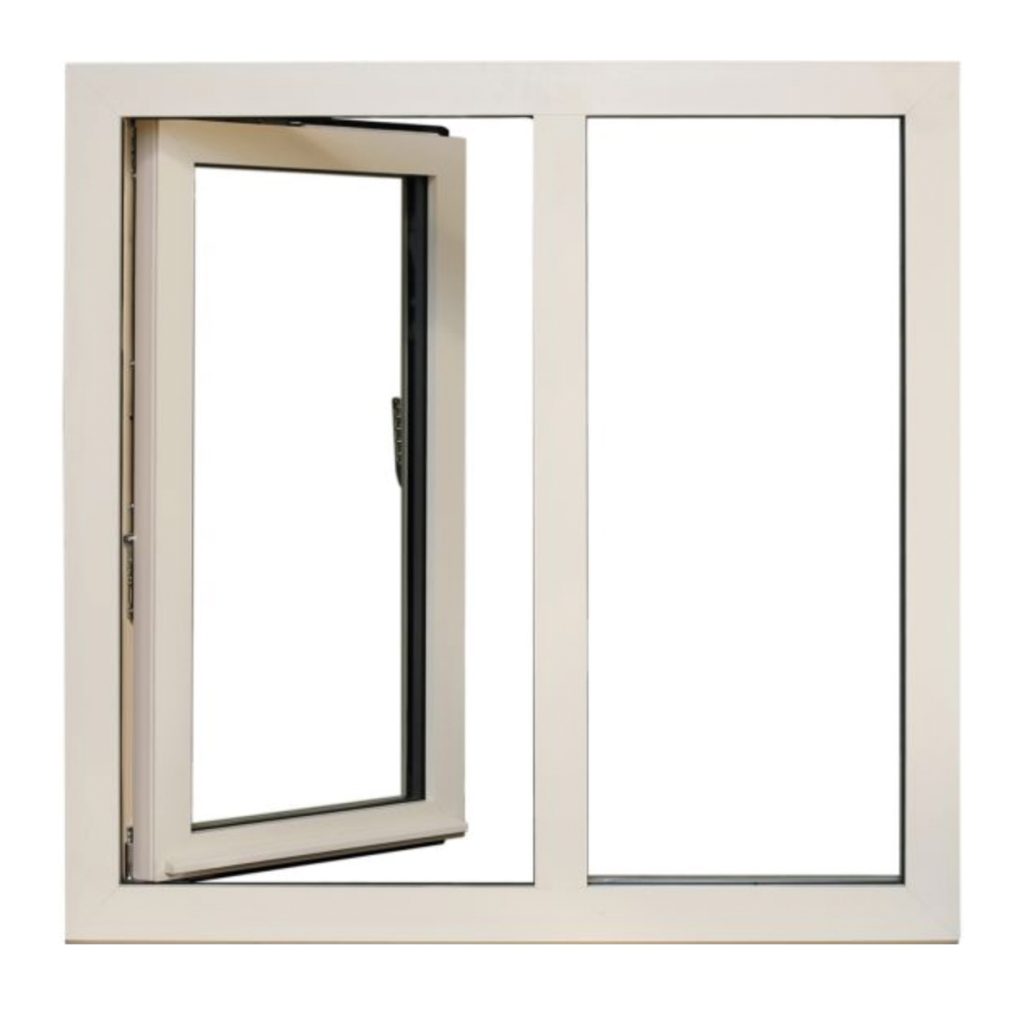
Passive certified window hardware (hinge and locking mechanism) is normally different to the standard casement window in that they are tilt and turn.
This means that when the window is closed it provides a much better seal for airtightness than can be achieved with standard casement window mechanisms. However, it does mean that the window will open inwards which is something we will need to get used to. On the upside at least I’ll be able to clean them without hanging over the window ledge or climbing up a ladder!
Where to start?
Quite truthfully we toured every window stand at the Selfbuild Live shows. We were able to whittle down the choices by checking which windows were Passive House Institute (PHI) certified which includes both thermal performance and airtightness.
We were able to double check that the windows were indeed on the PHI database (you can check online on database.passivehouse.com) with all of the data we needed for the energy assessment.
This was not easy as it meant that we had to pass over some lovely looking window systems but, as I said at the beginning of this series, once you decide to go down the route of near passive, you need to be committed in pretty much every aspect otherwise you won’t achieve your goal.
And of course, previous experience – good or bad – also counts for a lot.
About six years ago we replaced the windows and doors in our office and used one of the companies under consideration. I have been able to see first hand how well the doors and windows have operated over time and it gave me reassurance with their product.
Shortlist checklist
Once we were down to a couple of companies, we got them to price our house and we also checked that they were able to provide the frame extensions that we needed. This aspect was important because we had to overlap the insulation onto the window frames to prevent any thermal bridges.
It may not seem significant but not all companies offer this option. In the end, figuring it all out actually saved us from a potentially expensive issue as we discovered that the width we had designed for our sliding patio door was too wide for a double section door.
We didn’t want a triple section so we actually reduced the width by 600mm to bring it within the manufacturer’s maximum width specification.
Finally, we also checked the performance of the triple glazing glass being used to ensure that it also performed badly from a solar gain perspective.
If that sounds a bit odd, it’s because we’ve been brought up to think that solar gain is good – but actually it could be a problem in a near passive house. Too much solar gain can lead to overheating which many people find more difficult to deal with than being slightly cool.
Lead times were also an important consideration. Our build schedule is quite tight so a 10 to 12 week lead time from measurement to install would have been problematic. The company we chose said they had a six week lead time.
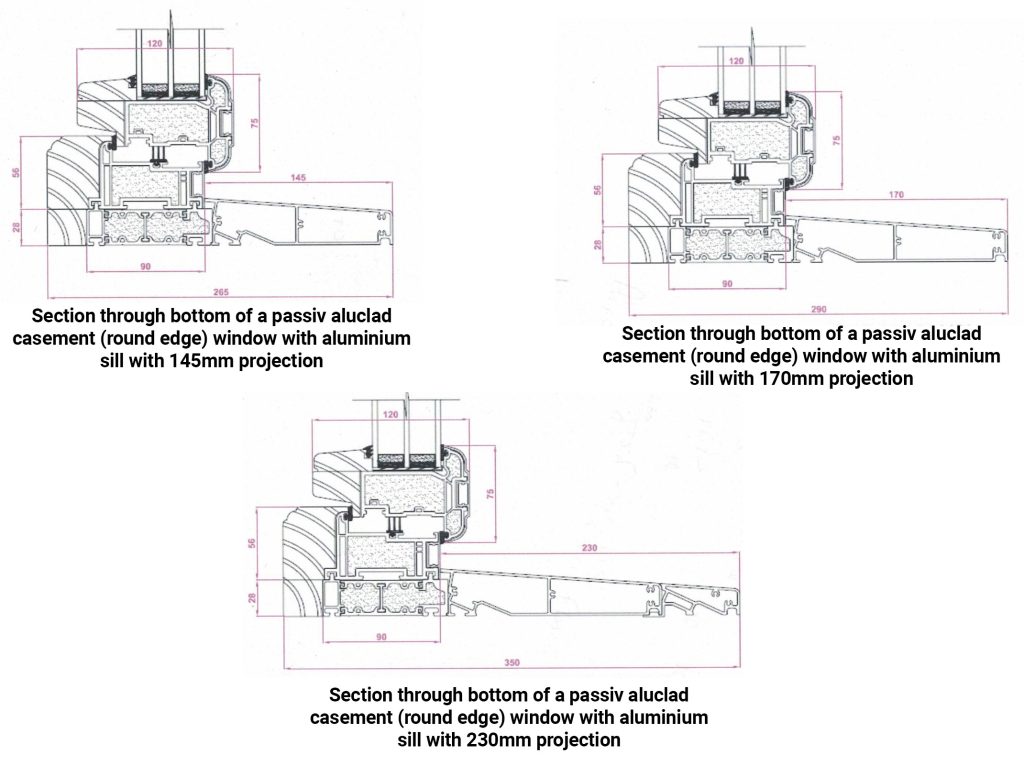
And then there were the sills…
Finally, just when you think you’ve everything covered something else always crops up! Whilst we had spent lots of time considering the various window options, we hadn’t actually put much thought into the windowsills.
In our case, the sills need to project far enough to clear a 60mm layer of insulation, a 45mm batten and then the cladding plus the 30-40mm clearance beyond. This would require a projection of 160mm but as it turns out this is only possible in the timber aluclad frame – not the uPVC as it’s not strong quite as strong.
This had implications on price as aluclad is more expensive and whilst we could have gotten someone else to manufacture a sill, it would have taken a fair bit of work including the colour matching and undoubtedly would have cost a fair amount.
Bottom line
In the end we made our final decision on a combination of all the factors above as well as our gut feeling as to which one we liked the most.
We also thought that the additional upfront cost of choosing aluclad over uPVC was worth it in order to save on having to get another company to make up colour matched sills separately. We are fortunate in Ireland to have had such as wide choice.
At the time of writing we are still waiting on the window delivery and I have been keeping in touch with the company to make sure the delivery will be on schedule, and in case anything changes. So far so good.
Part 8 – Design tailored to the site
As published in the Autumn 2022 edition of Selfbuild magazine.
Even though we were theoretically starting off with a blank slate, we had plenty of restrictions to contend with when designing our home, and it felt a bit like playing Tetris.
When people think about self-builders designing their own home, I think there’s a myth that they start with a blank sheet onto which they pour their design ideas. The reality is usually somewhat different, as my wife Karen and I quickly realised.
Shape and size
We had a number of restrictive planning conditions to contend with, along with the location and topography of the site. Before we even began sketching out any ideas, we had to consider all these factors and the effect they would have on any plans.
On our site the main issues we had to address were the relatively small footprint in which we could build and a ridge height limit of six metres which immediately ruled out a traditional two storey. It even made a storey and a half challenging.
The first thing that Karen and I did was sit down and work out what type of rooms we wanted and, also, what size we needed them to be to accommodate the type of furniture and function they would fulfil.
For example, if it was a bedroom we wanted to make sure there was enough space for a double bed, wardrobe and desk. We tried to be really strict on this as ultimately it would have an impact on the total size, i.e. cost, and we had a budget to keep within.
Location
The house position on the site pretty much decided itself as we wanted the rear elevation facing the garden to have a southerly orientation and the front elevation facing the driveway to the north.
This also suited the topography as the curved roof would blend in with the hills behind the house and it minimised the amount of excavation needed to create a level area to dig the foundations.
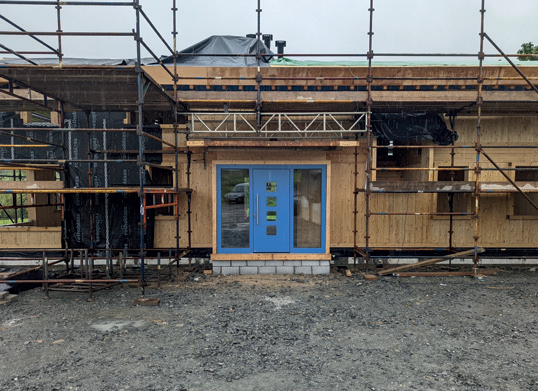
The door positionings were straightforward too, with the front door on the front facing northerly. Now this might seem obvious but one of my bugbears is houses with front doors that appear to be for decoration only.
We have all seen them. Doors that serve no purpose whatsoever. Any visitors arriving at the house have to pass the back door in order to get to the front door, which invariably is positioned miles away from any living area – therefore making it impractical to use in almost every scenario.
We wanted a front door that would, in practice, fulfil its intended role.
Tetris
Once we had worked out the number of rooms and sizes, we then embarked upon a game of house Tetris where we tried to fit it all together.
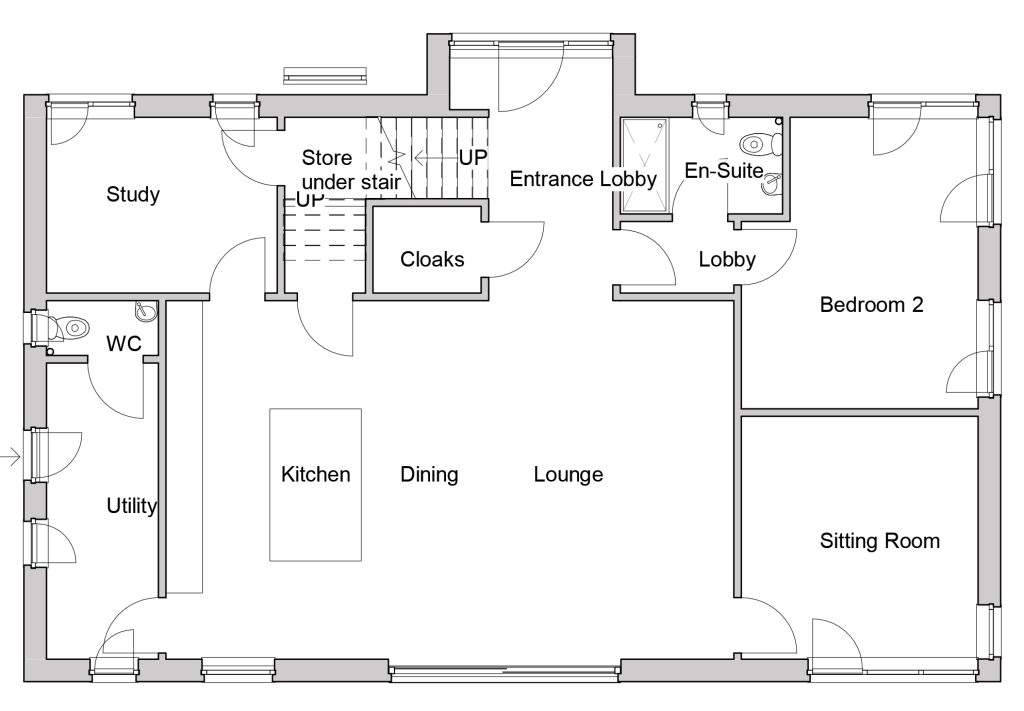
Initially, given the ridge height restriction, we tried to fit everything in on the ground floor, using different shaped footprints like an L shape but whatever we tried we were left with a large be the place where we spend 90 per cent of our time during the day.
Finally, everything began to slot into place and we ended up with a rectangular footprint, and no space wasted in corridors.
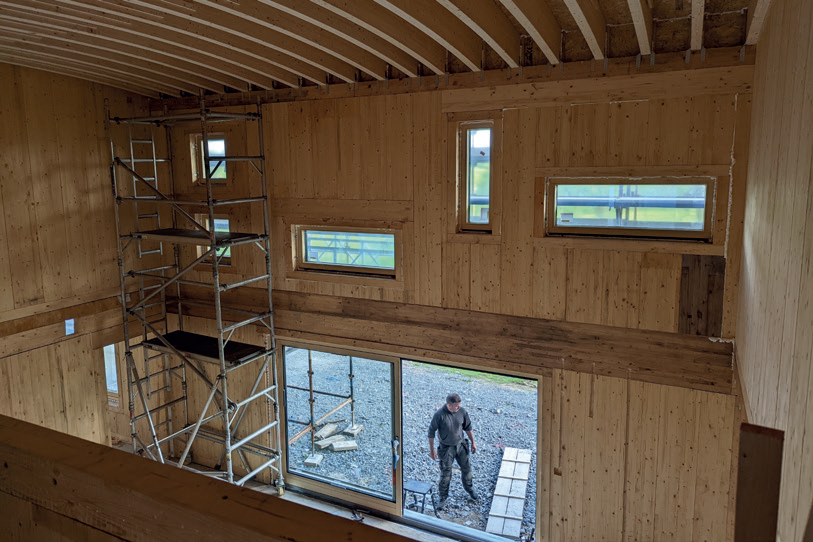
Now, some might argue with this last assertion when you see the double height area in the kitchen/living area. However, it was always our intention to have a high ceiling here to give it a real sense of space and openness.
When doing the layout there were some rooms like the sitting room/snug and study/office that we wanted to be immediately accessible off the main room, and there were others like the guest bedroom which we wanted to be more remote to give privacy and separation.
Links to the garden
We also designed in some lovely big sliding patio doors to connect the kitchen/living area with the patio and garden at the back.
This was a compromise as the window manufacturer could not provide a passive rated sliding patio door, so we just had to go with their standard triple
glazed unit in the knowledge that the airtightness won’t be quite as good as the rest of the fenestration. But it was still good enough as our recent airtightness test gave us a value of 0.56 m3/(h.sqm) at 50Pa which is below the 0.6 German Passive House requirement.
Finally, the back door also found its natural place, positioned on the west elevation to connect the utility room to the outside space where we can dry washing and provide easy access to where the cars will be parked and the shed which we will use for storage due to not having a roof space.
Speaking of the shed (pictured below), we built it prior to building the main house. Some people described it as my man cave but really its purpose was to serve as a base for the main build.
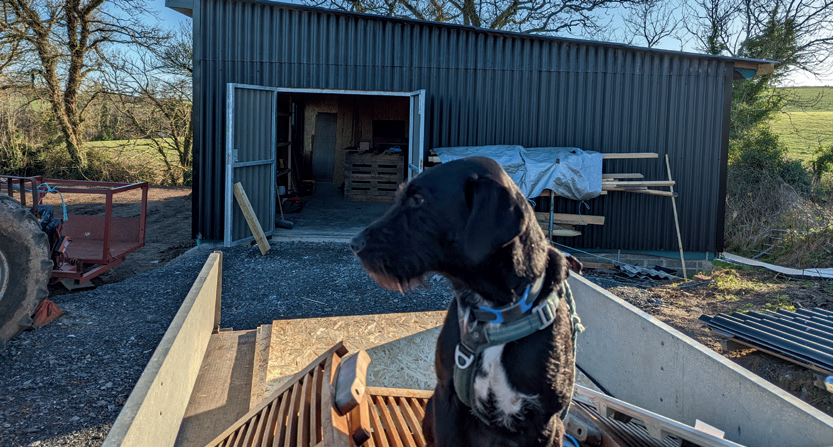
This turned out to be more important than I could have imagined for it was fully secure for the storage of tools and materials and provided a haven when the weather turned foul.
Did I mention that it was, also, fully insulated and plumbed with kitchen sink, wc facilities and the all important kettle, microwave and fridge. It could very well turn out to be a man cave after all.
Hidden M&E
The ventilation system and plumbing, integral parts of the Mechanical & Electrical (M&E) components of your home, are bits that will never be seen.
But they are what will provide a healthy environment inside the house. It was absolutely critical that this was all designed prior to finalising the house plans because it turned out that the room I had on the plans was not going to be wide enough to accommodate the ventilation unit.
So we had to steal 200mm from the upstairs bathroom. Easily done at the design stage but would have been a disaster had we left it later. The plant room is centrally located to provide short runs to all the bathrooms which will hopefully mean that hot water can be delivered quickly, efficiently (less heat loss), when required and minimise water wastage.
The central location of the plant room also makes it a perfect place to distribute and connect up all the cables for TV and internet. This is never a pretty sight so we thought it best to keep these out of any rooms that we will be using regularly.