A stick build is the DIY way to build a timber frame house; it’s also the method that the late self-build architect Walter Segal favoured.
In this article we cover:
- What is a stick build
- Steps involved in a stick build
- Building regulations for a stick build
- What is the Segal method
- What are the steps to building a house to the Segal method
- What is the oak frame method and what are the steps involved
- What are roundwood structures and how are they built
- Working with green timber
- Drying times and tools you’ll need
- Your options if you plan to go with a stick build
Stick build describes a method of creating structures that are built up on site from individual pieces of timber. The main architectural objective is to create a home that uses timber in ways that are not readily perceived as being factory produced.
In reality, you can build the whole structural frame in sections in a factory or shed to make sure that all the connection joints fit properly, then reassemble it on site. This is not necessarily the time consuming task that it might first appear to be, as it allows the opportunity to make adjustments which would be difficult to achieve on site.
It also borrows from the factory controlled offsite construction benefits of prefabricated timber frame manufacture. One well known example of how large timber structural frames can be erected in a day can be seen by checking online for examples of Amish barn raising.
The stick build approach is a bit of a misnomer nowadays in that the term ‘stick’ no longer refers to what we would normally think of as sticks, but can be any size of timber element from small diameter roundwood poles to large section engineered timber beams.
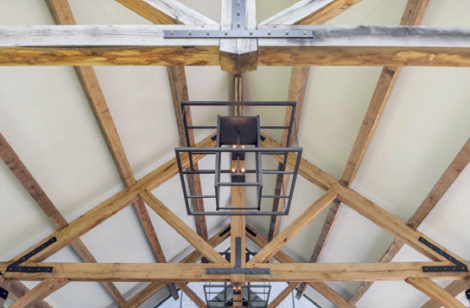
The main idea of the stick build method is that you start with a structural frame or skeleton, which can be filled, encased or left exposed according to the design objectives. In a similar way to the prefabricated type of timber frame structure, the external wall panels will need to be well insulated and would have an exterior facing of brick, blockwork, stone or cladding. The method also lends itself well to the use of interesting roof trusses which can be as simple or as complex as they need to be.
This type of timber frame is often the basis for what many refer to as an eco build, that is where the walls are lined with a renewable insulation product such as straw bale. With shuttering, timber frame is also the structural base for hemp-lime or rammed earth construction. Steel frame is an alternative but is more expensive and harder to work with than timber.
The standard building regulations in use in the UK and Ireland do not specifically include dwellings built by stick build methods, but neither do they rule them out. The European and national standards for timber structures, where they apply to solid timber, only cover regular rectangular or circular section members or poles and not irregular shaped members.
Whether you choose to use standardised strength graded timber or engineered timber from a timber merchant or roundwood from a local woodland, this method of building does not have industrial certification or quality assurance so it is vital that it is designed and certified by a structural engineer. It may also be a good idea to sound out the opinion of your mortgage lenders before embarking on the project.
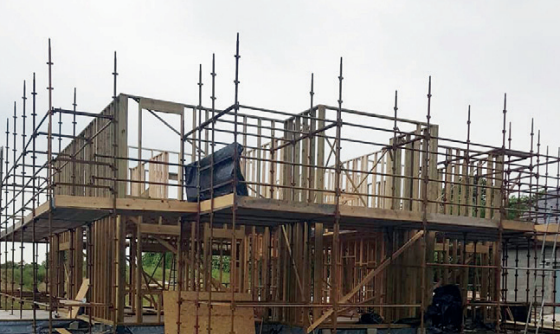
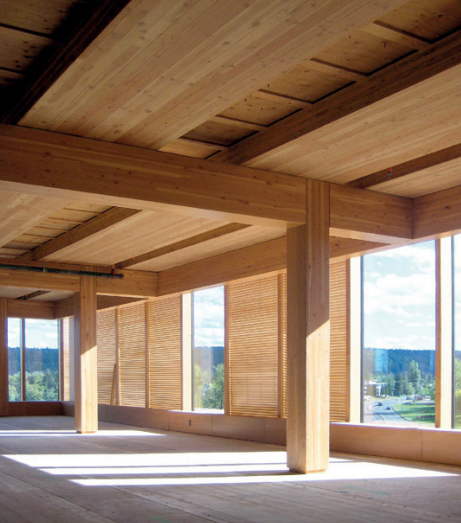
Oak frame example
The general stick build method is still used in oak framed building, where the construction is based around a structural skeleton of oak framing using tried and tested jointing techniques. Traditionally built by skilled craftsmen using mainly hand tools, the stick build methods can be adapted for more modern methods of construction.
Usually for reasons of economy, prefabricated factory produced timber frame homes tend to follow a restrictive standards based set of methods and processes, whereas a stick built home can have more flexibility in its approach to design.
One such approach would be to take the example of traditional oak framed structures and follow a layout such as the aisled frame. This layout consisted of a series of frames which were formed to create bays which supported the roof, but the rafters were extended down onto external walls set outside the main frames. Such a structure would remove most of the roof loads from the external walls and the external timber wall panels.
Another solution would be to adopt the ‘post and beam’ structure which consists of horizontal beams carried across two or more uprights. Each set of posts and beams are then repeated in bays along the length of the building and as these frames carry the roof, open plan spaces are easy to create. Either of these frame types will require timber bracing to provide racking resistance.
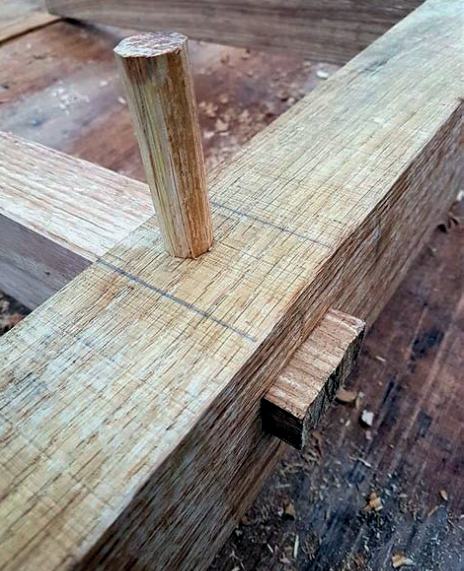
Importantly, you do not have to build this type of design in oak but can use more economical or readily available alternatives. In all such timber that has been sawn into squared planks, beams or columns, the most often used joint is the pegged mortice and tenon joint, whereby a hole for a peg is drilled across the midpoint of the tenon where it slots into the mortice.
The peg is tapered so that when it is driven into the joint it locks in. Usually the hole for the peg in the tenon is offset slightly from the hole through the mortice so that when the peg is hammered in, it pulls the shoulders of the tenon tightly into the mortice joint.
The Segal method
For the more adventurous and environmentally friendly selfbuilders, perhaps the best known building method which would fall under the title of stick build is that attributed to Walter Segal, a Berlin-born architect who moved to England in the 1930s.
He has been quoted in many construction related publications but his innovative rethinking of standard building processes is well worth remembering. The methodology for making large savings in build costs that he developed in the 1960s can be summarised as follows:
- Base the building structure on a bolt jointed timber post and beam framework.
- Make everything as simple as possible.
- Accommodate tolerances and thermal movement without complex construction details.
- The structure should be buildable by someone with basic carpentry skills, although installation of services would be completed by a plumber and electrician.
- Only basic hand tools should be required.
- Make maximum use of materials in their standard sizes to reduce waste and cutting, through use of a design based on a simple grid.
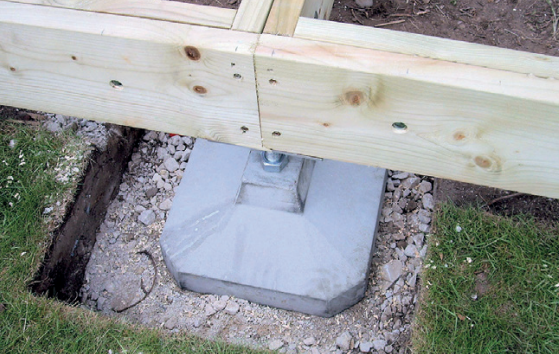
- Support the posts on simple concrete pad foundations, the holes for which can be excavated by hand and the concrete mixed on site. (Segal’s original house used paving slabs as pad foundations.)
- Raise the ground floor so that oversite concrete is not required.
- Avoid the use of wet trades such as bricklaying and plastering.
- Make it easy to insulate to a high standard.
- Make the building easy to adapt and extend if necessary.
- Can be constructed up to three storeys if required.
- Passivhaus or zero carbon levels of energy usage must be achievable.
Even with such a simple approach, it is still possible to achieve a wide variety of configurations including the use of one or two storeys, double height rooms, split levels, courtyards, flat or pitched roofs and so on.
The use of simple dry joints fixed with bolts or screws makes it easy for almost anyone o assemble such a structure with minimal assistance. A structural engineer will be required at the design stage and as with any other dwelling, the relevant approvals must be obtained before works
commence.
Roundwood structures
This is a much older building method than that of the squared off timber method. The usual procedure for building a roundwood structure is to create the structural framework using poles or logs and then build the wall panels between or around the timbers.
The wall panels can be similar in composition to those of any other timber frame structure but apart from their own lateral resistance to wind, don’t need to carry any other loads.
The usual timeframe for constructing a roundwood framed structure is governed by the right time to fell the timber (autumn), cutting the joints in the winter, then erection of the frame in the spring so that it can be made weathertight by summertime and ready for finishing out in the autumn.
The overriding principle is that the timber comes directly from the forest to your site. Benefits of using roundwood as opposed to sawn timber planks would include:
- It looks natural, is aesthetically pleasing, and reminds us of where timber comes from.
- A circular section pole is stronger than any plank cut from it.
- It allows the use of coppiced trees and smaller diameter trees.
- It reduces the energy and financial costs of intensive industrial processing and unnecessary transportation.
Roundwood generally describes timber that is cut from the tree without further processing, such as sawing into planks or squaring it off, although debarking it will increase its longevity and this should be done as soon as possible after felling. Some timber frame companies will debark logs and poles using high pressure water, which leaves a smooth timber finish. DIY debarking is usually done using simple tools, but care needs to be exercised to ensure that only the bark and no timber underneath it, is removed.
After debarking, get rid of any stringy material which has been left and scrub off the sap residue using a natural watered vinegar solution. Then stack the poles or logs to dry, off the ground and separated from each other, in a position where air can circulate freely through the stack. Some forestry
professionals suggest that the cut ends of the timber be sealed with natural wax to dry the timber more evenly throughout its length and to prevent cracking at the ends. The best place to store the timber would be under a roofed, open sided shelter and not under a tarpaulin or in an enclosed shed.
Timber used for construction purposes within a building is regarded as dry when its moisture content is kept below 20 per cent, but to dry timber naturally down to this level could take a long time. The length of time needed will depend on factors such as the timber species, its age, density and dimensions, the time of year it was harvested and the ambient air humidity.
One rule of thumb is that it takes about a year per 25mm for solid timber to dry, so a 200mm diameter roundwood log would take about four years to dry all the way through. The faster alternative is to transport the timber to a timber producer’s premises to get it kiln dried, although this extra transportation and high energy processing somewhat dilutes the environmental value of using the timber in the first place.
This means that a decision needs to be made as to whether to use green timber. Being used in its ‘wet’ state, green timber will likely develop some splits and cracks known as ‘checks’ arising from uneven shrinkage as time progresses. As long as these checks do not continue all the way through the timber, it should remain structurally sound and the appearance remains naturally rustic.
Building using green oak is a well developed building method and there is no reason why other species of trees cannot be used in the same way. After all, many timber structures remain in perfect condition today after being built at a time when there were no timber drying kilns in existence.
The main thing to consider when using green timber is that it will continue to shrink after it has been erected, so joints and other components need to be formed with this in mind. Timber shrinkage will occur mostly across its width or depth and is negligible along its length.
Joints for roundwood frames are similar to those used in oak type framing in that they are usually formed using a pegged mortice and tenon joint, but do not tend to use the offset pegging method of tightening the joint.
The timber pegs are handmade and can be circular and slightly tapered or octagonal so that the edges lock it into the joint. Wedges can also be used to tighten up the joint. Remove sapwood from any joints that are likely to be exposed to moisture.
If you are considering a DIY roundwood home build and haven’t attempted anything like it before, start with a small garden project to see how you get on. Every child, including the grownup ones, loves a treehouse.
Maybe also get yourself onto a green woodworking course. Seek advice from a designer, especially if you are taking on something which might need planning or building control approval. You could find power tools for most of the jobs, but they tend to remove the natural look that is so characteristic of roundwood structures. The greenest and most natural way to build with roundwood is to use hand tools such as these:
- Mallets of different sizes.
- Wedges of different sizes for splitting timber.
- A set of good quality wood chisels, straight and curved.
- A hand auger and a few suitable sized bits for drilling holes.
- A decent handsaw and a bow saw.
- An adze for bigger hewn work and a spokeshave for finer finishing work.
- A froe. It looks a bit like a sturdy knife but with the handle set at right angles to the blade.
- A side axe which has the blade bevelled only on one side.
To make your own pegs for the timber joints, a shave horse and draw knife are not difficult to set up yourself and speeds up peg making. A dowel plate is useful too, which in its simplest form is a piece of steel with a number of different diameter holes through which you bash roughly rounded pegs to improve their shape.
Hybrid approach
If you don’t have the time to follow the complete DIY route, you could get a specialist joinery company to make up the timber members and all the joints, then assemble it on site yourself with some assistance if need be. Some joinery firms will take the conceptual design from your designer and combine this with 3D CAD models to let you see what can be built and also to help them in the manufacturing process. They will use machines to cut, joint and plane the timber, but should leave it looking as natural as possible.
Follow the Segal method for the siteworks and use stainless steel dowels and plates to keep the timber separate from the concrete foundation pads. For wall panels, since they are not load bearing, you can make them yourself in a shed. An easy option would be to make panels up using durable cladding on the outside of a simple stud frame, with an economical internal lining.
If the structure is to be habitable, the wall panels need to be adequately insulated with moisture control layers and ventilated cavities. The insulation can be fitted as you go along or you could get it injected or sprayed into the hollow panels.