According to the UK Building Research Establishment, a house built to be reasonably airtight and to the current ROI building regulations (5 cubic meters/h/sqm at 50Pa) consumes 40 per cent less energy than a house built to the old building regulation standard of 10 cubic meters/h/sqm.
You’ve been told many times about the need to insulate your home to a high standard. This is indeed by far the most cost effective way to lower your fuel bills, not to mention comply with the energy requirements of the building regulations. But insulation and airtightness go hand in hand.
Indeed after the insulation is fitted, an airtight membrane/vapour control layer must be applied to the warm side of the insulation, otherwise all the hard work you put into insulating and protecting your home will literally leak at the seams.
Airtightness, or air flow and vapour control, (a term that takes into account the risk of condensation as well as the air exchange rate), is often associated with highly energy efficient homes. But that’s not always the case. In fact you can make your house airtight with natural ventilation.
With regards to the building regulations, it doesn’t matter which ventilation system you choose because during the airtightness test all of the vents, extracts (be they mechanical ventilation, trickle vents, passive stack, etc.) and chimneys are required to be sealed.
Where there is no mechanical ventilation, the wall vents are the only means of moisture management and may not be enough to manage moisture that you will be creating from living in the house. The building regulations take into account both ventilation and airtightness to determine how many vents you will need to keep the building ventilated. Too large a number of vents will cause draughts.
So if you are only relying on trickle vents for ventilation, it is good practice to open your windows to the front and rear of the home for 30 minutes two to three times a day as this will clear moisture from the building. This practice has been well tried and tested in countries such as Germany and Switzerland.
But as seen in the previous edition’s Systems Guide, Nearly Zero Energy homes and the ROI building regulations almost make mechanical ventilation a de facto requirement.
Construction drawings
The first step is to take pen to paper. Get the plans of your building and place a pen at a start point of your choosing (internally on the section) and then draw a continuous line around the entire building where you will have a continuous airtight envelope.

Any potential air leaks are when you have to pick your pen up from the paper, and as you may have guessed, particularly prevalent areas for air leakage are dormer windows, roof lights, windows, doors, junctions between floors and walls, loft hatches, etc. The rules for creating airtight seals at such junctions are as follows.
When the membrane meets a block wall (at a gable end for example) you will need to use a proprietary mastic to seal the edge of the membrane to the blockwork. It is important to emphasise that standard cavity blockwork is not airtight until it is plastered. Therefore it is recommended that the blockwork is plastered with a scratch coat prior to using the mastic. Continue the scratch coat right down to where the block meets the floor, even where it will be covered by skirting, as the skirting itself will not be draught proof.
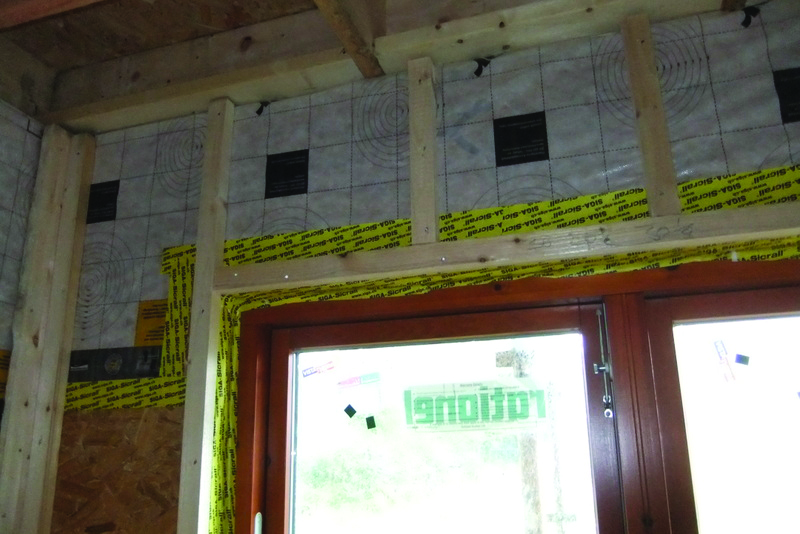
Where the membrane overlaps or meets a smooth or hard surface, you can seal the membrane using proprietary tape.
Remember to think about every single section of your building. It’s easy to see that your pen would lift off the paper when a floor meets a wall; this is another critical junction and the solution for maintaining airtightness depends on the type of floor construction.
For a hollow core floor it is recommended that a section of airtightness membrane be laid on top of the wall on which it is to be placed. The membrane then wraps up the side and over the top of the hollowcore flooring; the blockwork for the upper floor is then laid on top of the membrane.
This section of ‘wrapping’ membrane is then fixed to the wall or vertical membrane. In the case of a timber floor, you have two alternatives. You can either use the hollow core floor technique or you can use tape to seal around each joist to a plastered wall.
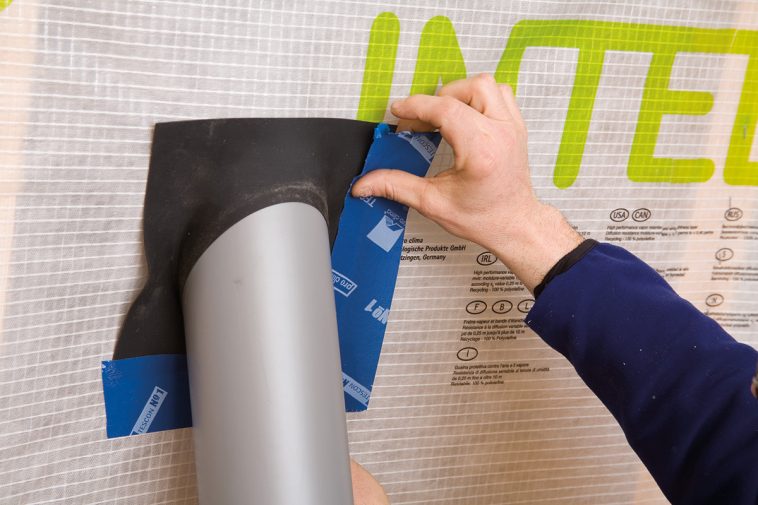
A special tape with the same properties as the membrane will be supplied along with the membrane itself. It is very important that this tape is used correctly as even a very small gap can significantly affect the results of the air permeability test. All joints between sections of membrane and between the membrane and hard surfaces must be fully taped. Where it is necessary to cut a slit in the membrane, for pipes and cables etc, the tape must fully cover the slit and overlap the pipe/cable.
Blower door test
All new houses in ROI must be air pressure tested with a blower door test, to prove compliance with the minimum building regulation requirements. In NI, the test can be foregone in a single dwelling but an air permeability figure of 15 m3/(h.sqm) must be used in the SAP assessment, which will mean compensating measures elsewhere. The tester must have the relevant approvals from the NSAI (ROI) or the BBA (NI).

To carry out the test, a temporary frame is built into an external door with a fan that is connected to specialised software. Specific ventilators, e.g. air vents, and plumbing traps are filled before pressurising the dwelling with a large fan.
The pressure drop across the fan will be proportional to the air leakage from the building.
Readings are taken periodically as the building pressure builds up and are continued as it decreases after the fan is turned off. In this way, the impact of different pressure effects across the building can be assessed.
The cost for a professional test on a standard house is in the order of £300/€350 plus VAT.
The bigger the number the worse the result; less than five m3/(h.sqm) is doing well, while less than three is quite good for a standard house, though nowhere near the requirement for a passive house.
Bear in mind that the airtightness results will have a significant impact on the A to G rating you will get under your Energy Performance Certificate / Building Energy Rating.
Remember too that airtightness affects the efficiency of a Mechanical Ventilation with Heat Recovery (MVHR) system – higher levels of air leakage unbalance the system by either allowing warm air to escape through the fabric thus bypassing the heat recovery, or by allowing cold air to enter the building without being warmed up. Or both. So with MVHR you should be looking for a figure of two or three m3/(h.sqm), or even lower if possible.
The purpose of the test is to find the unknown leaks and to determine a value for them, not to catch the builder out. Cooperation is key to a successful outcome. Having said that, remedial measures may be tricky, time consuming and costly and air permeability is a good indicator of build quality. Make sure your builder knows the figure you are targeting and is confident of being able to achieve it.
The test should take no more than one hour during which there will be absolutely no access to the house. Testing an occupied house tends to be more time consuming and therefore more expensive. Tell everyone who’s working on site ahead of when the test is due to take place as delays may incur an extra charge.
No wet finishes (paint, plaster etc.) should be applied within the vicinity of the test as blown dust may damage the finished surface.
All vent fans must be turned off, water taps filled and a temporary frame/boarding fitted to an external door to allow the air tightness equipment to be positioned. All mechanical ventilation openings must be sealed prior to the test and all external doors and windows closed, (but not temporarily sealed), to provide a realistic measurement of the actual envelope leakage. Natural ventilation openings and smoke vents should be closed but not sealed.
All internal doors should be wedged open to allow rapid pressure equalisation within the building during the test.
As low wind speed is required, it may be necessary to change the day of the test if the weather is stormy. Pressurisation tests are generally only undertaken under moderate external wind speeds of less than 6m/sec. Wind speeds above this level can have a significant influence on the measured envelope leakage rates and test results carried out in excessively windy conditions should not generally be accepted.
A 240V mains power or a generator producing at least 15kVA for the first fan and 10kVA per fan thereafter is required, as are several 13amp mains sockets close to the working area. Alternatively extension cables can be used over a reasonable distance.
Repeat tests are normally 75 per cent of the original fee. If a test is cancelled after arrival on site due to non-compliance with the above requirements or others outside the control of the air testing company (apart from climatic), an additional charge, based on distance travelled, will be incurred.
A representative for the main contractor, or the client, must be on site to discuss the initial results and any implications these may have for remedial sealing.