Before laminated boards and carpet were the mainstay of Irish houses, wood blocks were the preferred choice of floor finish. To get a touch of old school class in your new build you may need to call in the professionals but it all depends on the complexity of the pattern you choose and whether you’re willing to take a few shortcuts…
“The wood blocks can be fixed to any floor surface such as concrete, levelling compound or flooring grade plywood. They should not however be fixed directly to floor boards…”
Wood blocks have adorned the floors of grand buildings and ballrooms alike, showing a certain “je ne sais quoi” for those who could afford it. It came in many styles and timber types, colours and species.
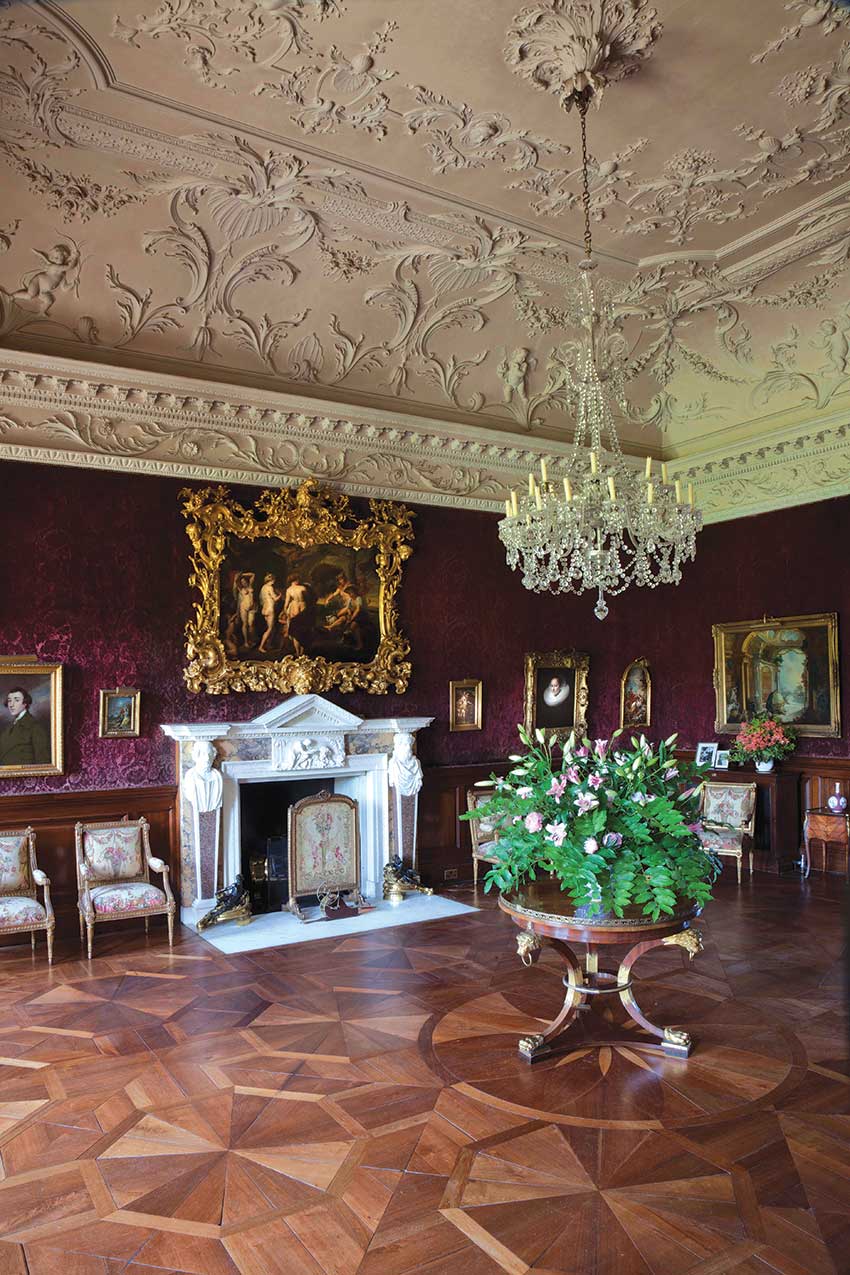
You only have to look at the Saloon in Russborough House, Wicklow to see the extent and beauty of these magnificent floors. The skill and patience to lay them justify the price of this ancient and highly skilled practice.

Not all wood block flooring – or parquet as it is sometimes referred to – has to be as extravagant as this and it is possible to decorate your own floors with this highly impressive covering. The first decision that has to be made is the type of pattern you would like to create.
The most popular is the herringbone – a timeless classic that consists of boards laid in a V shape. There are many variations, including the 45deg herringbone, 90deg herringbone and the stretcher bond. The complexity of laying these is best left to the professionals and not within the scope of this particular article but we will explore how you can try your hand at the square basket design, which is the most straightforward to lay.
As with most jobs of this nature, planning the layout is time well spent and will guarantee the desired result. If you aim to get the authentic look, reclaimed timber can be bought either online or from salvage yards and always gives an extra sense of satisfaction as you give an old floor a new lease of life.
Many companies also supply and fit, and from them you should be able to choose new or old timber according to your preference. In addition to standard blocks there are tongue and groove alternatives; from timber boards that have alternating patterns to give you a geometric effect, to boards with alternating designs that are fitted at an angle to one another.
For more complex patters, tongue and groove tile size sheets are also available. Before you start on your project, make sure the wood has had enough time to adjust to its environment (two to three weeks). If you have underfloor heating ask your suppliers (flooring and ufh) about compatibility – if the wood block is too thick the efficiency of the system may be reduced.
While some types will be unsuitable for underfloor heating, others such as those made of engineered wood will work very well.
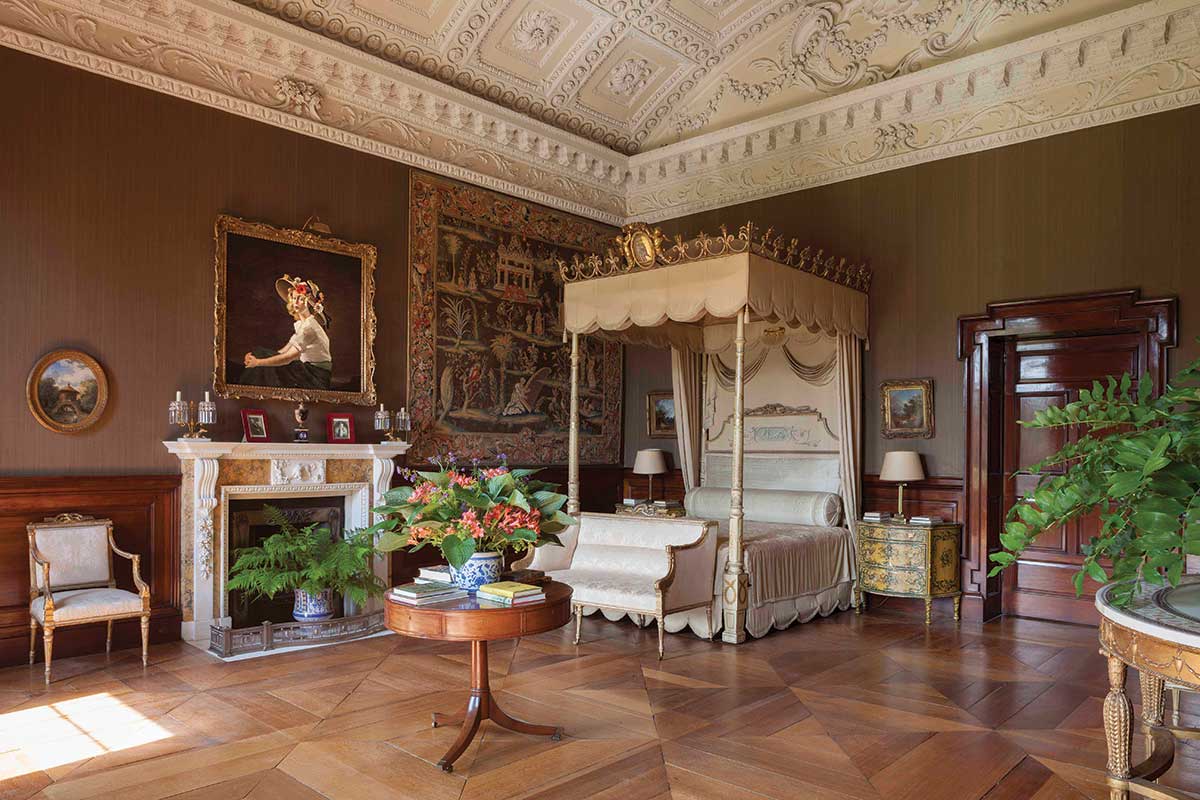 Image Source: Tapestry Room at Russborough House, Blessington, Co. Wicklow. Photo by James Fennell
One common requirement with underfloor heating is to ensure the temperature doesn’t go over 27 degC. The timber used in the floor should also have been kiln dried for a low moisture content of 10 to 12 per cent.
Weaving the basket
The square basket design consists of four narrow strips of wood glued side by side on a backing material to create a square block. These are then laid at right angles to make a pattern. To lay this wood block flooring, and any other type, setting up correctly from the start is crucial. It is worth spending the time to make sure that the pattern is centred and doesn’t look uneven or unbalanced in the room.
To achieve this, the middle of the room must be clearly established. The best tool to mark it out is the chalk line. Start by measuring one side of the room (it doesn’t matter if you start with the long or short end) and mark the central dividing line with the chalk line.
The next step is to strike another line through the centre of this dividing line at a perfect right angle. To make sure the lines are perpendicular, we have to revert back to our mathematics class days by using the Pythagoras theorem or isosceles triangles. Whoever said “What’s the point of learning maths”?! For either method find the centre of your first line and mark this point.
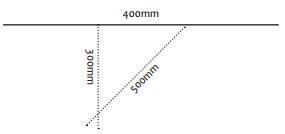
Pythagoras method
From this central point, make a marking that’s 400mm away. From the centre point measure 300mm in the general direction of the line that is going to form the right angle. Return to the 400mm marking and measure 500mm and scribe an arc through the 300mm line. This resulting marking when joined to the central point will make a right angle.
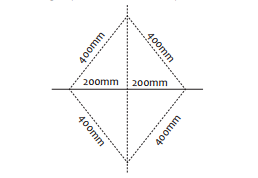
Isosceles or rhombus method
Measure 200mm from the centre point on both sides and mark them. Measure 400mm from these new markings and scribe, above the central point, where they meet on both sides of your dividing line. When joined they will cross your central point at a right angle. As long as they are equidistant you can measure a shorter or longer distance from the center point to suit your needs (in this case 200mm). The main thing is for the two sides of your triangles to be the same length (in this case 400mm).
If you’ve followed all that, congratulations! Hopefully the images will help illustrate the methods. You have now divided the room in half both vertically and horizontally. This central point is where you will start laying the blocks. It is common practice to do a dry run first, to ensure an equal amount of blocks are being used on both sides of the centre line. Although it may take some time, it will save you hours of work if your measurements did not work out.
Start where the two lines cross and work towards the walls making sure to keep the blocks along the lines (no gap is necessary between the blocks). The wood blocks can be fixed to any floor surface such as concrete, levelling compound or flooring grade plywood.
They should not however be fixed directly to floor boards as these can expand and contract and cause a whole host of problems later on. Any floor boards should be covered with plywood before fixing the flooring blocks. Bear in mind this will raise your floor level and could interfere with doors openings, etc.
The method of fixing is with specialist adhesive bought in a builder’s merchant or flooring supplier. The type you use will be recommended by your wood block supplier and will be applied using a trowel similar in style to those used for laying floor tiles. A layer of adhesive is applied with the trowel and the flooring blocks are laid on top of this. In the case of tongue and groove boards applied to a timber subfloor, you could use secret nails instead. Continue working across the floor filling up the whole space.
Don’t apply too much adhesive at any one time as it can dry quickly and your work area can become messy. Be mindful to leave a 15mm gap around the perimeter of the room to allow for expansion that is similar to a conventional wooden floor. The skirting board will eventually cover this gap.
If you are using reclaimed timber, it will now be necessary to hire an industrial floor sander. Begin with a coarse grit and work down through the grades.
When you are happy with how it looks, you will have to apply a protective covering. This is a personal choice and there are many products on the market; I would recommend a tough finish such as varnish. The last job is to fix the skirting boards back onto the walls. Maintenance is the same as for regular wooden flooring and if you find there is an issue with the glued floor, it will pose as much difficulty to repair it as it would a normal timber floor – the problem area can be cut out and replaced.
However bear in mind it may be very difficult to match the timber. Congratulations, now is the time to sit back and enjoy the fruits of your labour. And whatever stage you are at with your parquet project, keep an eye out for wood block flooring on your travels. They show up in places such as churches, libraries and also museums.
Once you start to notice them, you’ll see them everywhere. Enjoy!
Did you know?
Parquet in French simply means flooring made up of timber slats, so it refers to your everyday wooden floor, with or without geometric pattern.
Vocab: Chalk Line
A chalk line is a special marking out tool that has a string enclosed in a body of chalk dust. When you pull out the string, much like a tape measure, it is covered in dust. When the string is held taut and you snap it against the floor, a line of chalk is left behind. A fantastically simple tool that does what it says on the tin.