Although it’s hard to imagine, standing in a
sea of mud on your site wondering where
Global Warming has been this summer, the
time is not very far away when your focus
will move from the inside to the out.
Unfortunately, many people leave this until
too late and suffer extra financial outlay
bringing back machinery to dig paths and
driveways, or workmen to lay patios and
decking. For the finished surface, choose
your paving contractor carefully; look at
samples, photographs, testimonials, outline
plans, costs, extras and a basic agreement.
For the security conscious, cable needs to be
buried for electric gates and lighting, as will
drains and pipes for water features. The top five elements to affect the cost of building your home.
Out Side and Out of Mind
Just as our houses have changed to reflect and accommodate movements in fashion, culture and our working lives, gardens have evolved too.Despite our very variable weather, there is a strong trend towards using the garden as an outside living area with easy to manage hard surfaces – decking, paving etc. – that are very low maintenance and versatile too. (Note that all concrete paving requires an annual clean, especially if near foliage.)You can even buy (and install yourself) mortar-less low garden steps and walling held together with a pin system. So why do we begrudge spending on something we are continually looking out upon when the weather is bad, and using when it’s not?The return on a relatively small investment is very high in terms of adding value to your house, and enjoyment of it to you.
For the sum of £5000/€7000 you create a really lovely setting for your new home, as well as providing extra living space for sunny days and al fresco dining. Should you decide to move on to another project, your investment will pay handsome dividends; remember that all – important first impression for potential buyers!
In the Beginning
When you design a house – most self-builders, extenders and renovators tend to be very hands on in this department – the design concept should cover both inside and out.The position of front and back doors will have a bearing on the location of driveways and paths for example,with other fixed items such as water features being the most important to set in place whilst you can still rearrange things on paper.On a practical note, having to put on boots every time you leave the house because there are no hard areas to walk on is not the happiest of situations, and, as we noted at the start, it’s all very much cheaper when workmen are on site anyway.
The setting
How do you approach the house from the road, does it flow properly and show the house to best advantage? Is there space to get the removal lorry in and out from the site? Where will the visitor parking space be, and where will you park your own cars?
As one professional garden and landscape designer remarked: “When the builder or architect is allowed a free hand to finish the areas immediately surrounding the house, clients let these professionals turn their houses into roundabouts, or little castles surrounded by a large expanse of tarmac or asphalt, which immediately cuts off the house from the garden. Removing the moat of tarmac is usually one of the first things that I would suggest to a client. How many times do you or anyone else for
that matter, need to drive the whole way around your house? Does your car not have a reverse gear? You can make a much more user friendly space for parking which is more often than not smaller, but much more space efficient, than using the whole area around the house”.
If the majority of the heavy work for the infrastructure such as hardcore for the driveway, patio and paths as well as earthworks is done at the outset it will save you money, but only if you have a proper plan and know where they all should be. Beware of giving in to the contractor’s suggestion that the patio should be a different shape, ie square, thus making life easier for him, but in the process losing its aesthetic quality, design function and overall enhancement of the house and garden.
Just cutting a swathe through the field is a waste of both time and money.
Gates
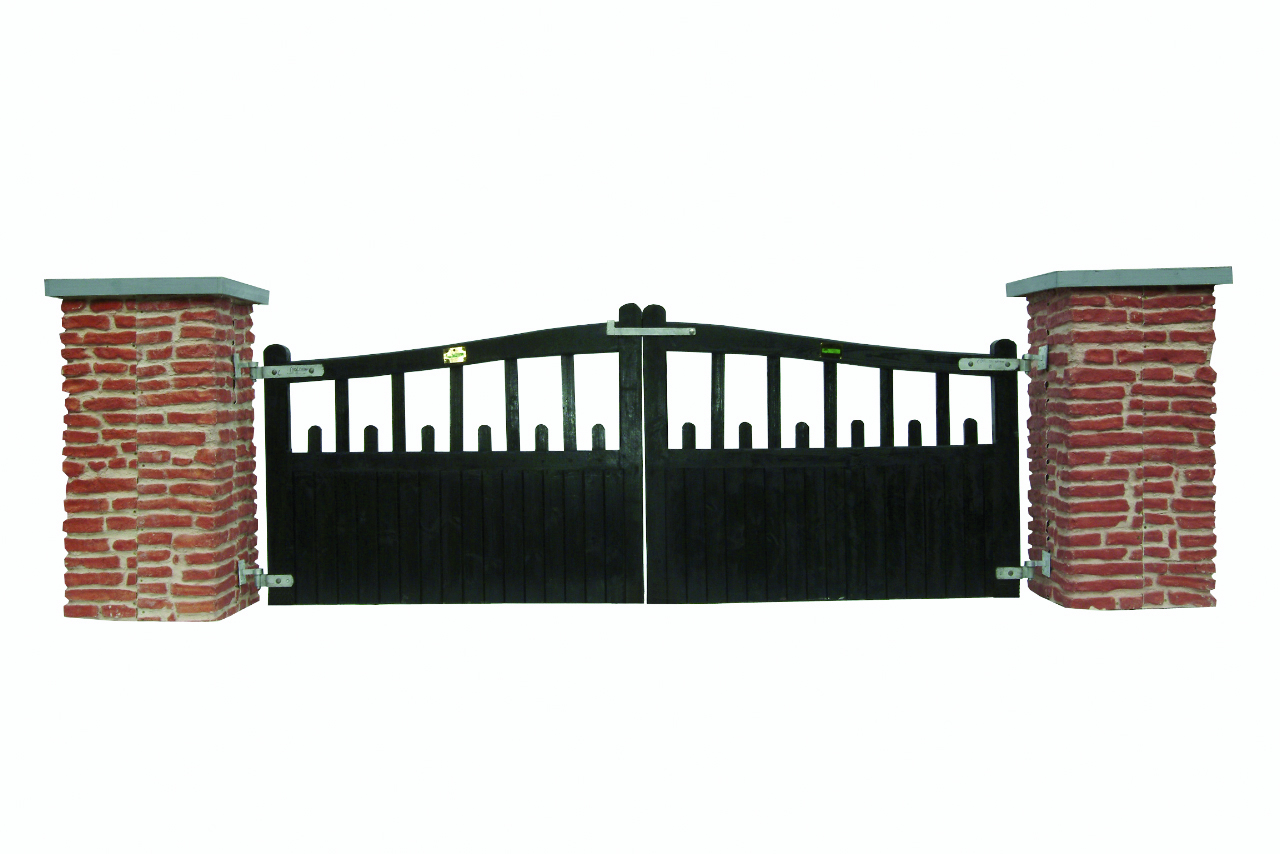
Gates for security are a priority for most people. Primarily of wood,wrought iron or steel, they can be hung in a variety of ways. Even if you want to delay purchase, it’s a good idea to build brick or stone pillars at the same time as the house so that the two match. If made of stone, you will need to put a steel shaft up the centre of the pillar to support the weight of the gate. If you’re building with brick,most bespoke gates require a separate post to hinge onto.However, there are some manufacturers now supplying a range of gates with adjustable hinges that can be hung off the pillar directly,without specialist adjusting.
Drive Time
Driveways and paths may look the same, but underneath they should be very different. Because of the heavier weight a drive will carry, it is essential to excavate until a hard surface is reached (the sub grade).This is then filled with hardcore to a depth of 350mm/12”, rolled to compact it, quarry dust spread over the top and rolled again so that the dust is pushed into the cracks to give a level surface. Finally, on top of that goes a layer of coarse sand before tarmac or asphalt is laid. It is very important that the hard core stone is washed and clean, free of earth and greenery. If not,
you may find weeds coming up at the edges of your drive, eventually causing the surface to crack.
Although asphalt is slightly more expensive than tarmac, it provides a tougher,more flexible surface which won’t melt in the sun or show oil stains. If you prefer a paved driveway using either pavers (clay or concrete) or flags (concrete), these should be a
minimum of 50mm/2” deep.

Previously,most paved driveways were constructed on a bed of mortar which set to a rigid finish.Now though, the trend is for ‘flexible’ construction where the pavers are placed a nominal 2-5mm apart on a 30 –50mm thick bed of coarse sand of equal thickness, and compacted into position by two or three passes of a vibrating plate compactor,with fine sand being brushed into the joints.The frictional restraint, known as ‘interlock’, created by the sand grains in the joints results in the course of pavers acting as a single layer.Without the friction, the pavers would move out of place. Some types of sand are especially formulated to prevent joint erosion and weed growth. If the driveway is very steep, (a gradient of 1 in 10 or more), you may be advised to use a rigid construction or break the area into short lengths of 10M or 15M with intermediate rigid restraints. Finally, remember that the finished level around the house must be at least 15cm below the level of the dpc (damp proof course).
Raindrops Keep Falling……
Water can weaken any unbound layers, including the sub grade, by acting as a lubricant between the particles and possibly increasing the risk of frost damage. Because of this, the driveway should be designed to shed water and, if necessary, a drain should be incorporated into the sub grade. Some soils, especially silts, chalks and some silty clays are liable to frost damage because they not only hold water naturally but also allow it to flow. This means that when the upper sub grade freezes,water can be drawn up from the water table below.The whole structure can be weakened further when it thaws as the water will be trapped for a while in the sub grade. To avoid all of this, the whole structure should have a thickness of not less than 450mm/18” to prevent frost penetration if the sub grade might be susceptible, and all the materials used be frost resistant too.
Because moisture and thermal movements can be accommodated in the joints of flexible paving,movement joints are not usually required. However, if you are using clay kerbs or pavers laid rigidly as edge restraints, these should have movement joints at approximately 6M intervals.
As mentioned previously, good drainage is essential in areas where water might be inclined to lie.Directing the water flow to a single point is difficult to do, especially if you’re using herringbone bond pattern.There are two options, either a dished channel formed from either the paving blocks or from concrete, or a channel which allows you to maintain the level surface if that is an important consideration.The first option is usually the preferred one because you can see immediately when it’s blocked. Block and flag paving is almost impermeable, as are mortar joints once set. Sand filled joints develop water resistance within a few months.Weather jointing of the paving can also help drainage by giving rainwater the least amount of obstruction as possible and
helping it to run off.
Keeping It All Together
Edge restraint along the perimeter of the driveway is needed to prevent it all spreading.You can utilise existing perimeter features such as a wall, and remember that all restraints should be in place before any compacting of the surface is done. Edge restraints should extend down to below the level of the bedding course (that is the layer below the flags/pavers).
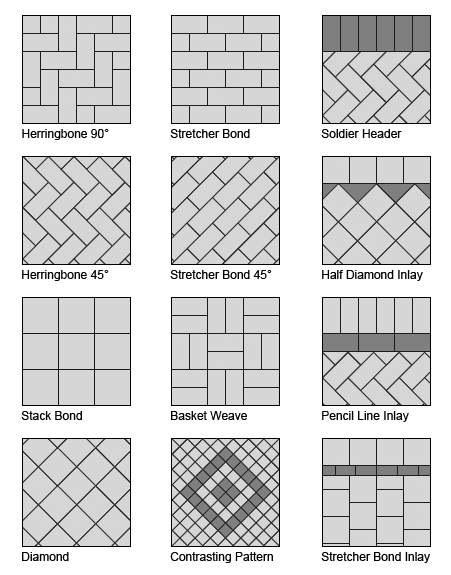
Style Setter
A surface made up of individual blocks lends itself particularly well to decorative patterned finishes and is also easy to repair as pavers can be replaced singly. For driveways, the choice lies between 45 or 90deg. herringbone bond, running bond and basket weave. Running bond is best avoided where there are tight curves because the joints might open on the curve and the pattern is difficult to maintain as well. In areas receiving only light foot traffic, a basket weave pattern could be used, provided it is laid carefully.
Stone and Slate will last forever but must be set in a fixed base of semi dry sand/cement mix – the same as is used on an internal house floor. Because the stones/slates are, unlike flags or new brick, all different shapes and sizes, the sand/cement mix makes it easier to get a reasonably level surface.To finish, they are pointed with wet cement to prevent weed growth. Power wash every twelve months to remove algae and dirt.
Similar in price are artificial stone and concrete look alike products; they weather differently as the colour is either applied to the surface or tinted right through for a longer lasting finish, so check this before you buy.
Poured Concrete can be mixed with a tint to colour it, but the colour will fade over time. Spraying with a sealant every two years helps to maintain the shading, but leaves the surface shiny.
Recently, patterned concrete has gained some market share; the process involves using a rubber mat to leave an impression on the poured concrete.Cracking can sometimes occur if a large area is covered and expansion joints not included.
Concrete Block paving comes in a range of colours and finishes and can be made to resemble stone, brick etc. It is very durable.
Brick in the form of clay bricks and pavers are extremely robust, resistant to damage by oil and petrol and less susceptible to permanent staining than concrete.They can also help to ‘tie in’ the garden to the house by using the same or a similar type of product. If this is your plan, it is best to buy all you will need at the one time to maintain uniformity of colour. Because of varying lighting and weathering conditions, and the composition of the mortar used, brick paving often has a different appearance from walls built of the same brick. It’s also a good idea to mix the bricks from at least three packs before starting so that the effects of slight colour differences can be minimised. There’s a huge variety of both colour and texture available, both of which can be used to created patterns or mark particular areas. Bricks are virtually maintenance free,will mellow with age and range in colour from buff and golden through to shades of red, grey and blue.The surface texture can be either rough (drag faced) for a slip resistant finish, or smooth. Slip resistance can also be achieved
by laying bricks on their edge, but this increases the cost because more are needed. Subjected to a constant cycle of freezing, thawing and wetting, it is important that you choose bricks and pavers that are fit for the purpose. Bricks suitable for external walls where they are protected from being saturated by design detailing,may not have adequate resistance to frost and the conditions found on a ground surface. Don’t assume that just because the brick is heavy or is described as not allowing water absorption that it will be frost resistant; follow the manufacturer’s recommendations carefully.Reclaimed bricks can be something of an unknown quantity in this regard; they may be weakened if they have been exposed to frost and the surface flake under the impact of traffic, they may also be of varying thicknesses.
The warning about frost resistance also applies to the mortar which should have a low permeability and adequate cement content, that is, a designation (i) mortar (1:3 cement:sand or 1:1/4:3 cement:lime:sand).Using coarser sand also helps, and avoid plasticisers as they may affect the durability of the mortar.
Efflorescence can occur with all clay and concrete products. It is noticeable as white powdery patches on the surface of the bricks or paving and will gradually weather away.How long this takes depends upon the site exposure, the amount of traffic over the path/driveway and the composition of the bricks/blocks. In concrete products the efflorescence is caused by lime in the limestone (one of the components of concrete), and in bricks it is from salts contained in the raw clay, both of which rise to the surface when the material is wetted. It is therefore good practice to keep the pavers as dry as possible before fixing into position.
Although the weather will do the job for you, the white deposit can be removed with a stiff, non metallic (ie. bristle) brush if you want a more immediate result.Washing with water is not recommended as this will soak into the pavers and the cycle will begin again.Acid based cleaners are available but follow the instructions with care and consult the manufacturer of the paving before using as acid attacks concrete and inappropriate application may alter the appearance of the paving.Neither is it advisable to use salt as a de-icer as this can affect both the durability and the looks of the paving.
Gravel driveways should be constructed exactly the same way underneath as previously described for tarmac and asphalt, with a topping of hot bitumen and then the gravel layer which should be twice the thickness of the chips. If properly applied,most of the gravel should stay in place and not require to be shovelled back into position, a back breaking process, every few months. There is also a product composed of an anti-rot sheet for gravel and pebble areas which gives excellent stability to the gravel and can take cars,wheelchairs, bicycles etc. (see info@ for details). Pouring a load of chips onto an existing drive is not a solution because they will rapidly disappear into the subsoil, onto the road and embed in areas adjacent to the driveway, eg. lawns and flower beds.
Grass paving blocks are becoming more widely used as a natural, alternative option for the need to have a hard area. Again the sub ground must be properly prepared to support the weight of vehicles,with perforated blocks available in either concrete or plastic, through which the grass grows.
Pathway To Heaven
Although pavements can be laid using either a rigid base or a flexible one, for reasons of costs mainly to do with the need for skilled labour and the extra time involved, nearly all pathways use a flexible construction. Flexible paving can also be put on top of a concrete base, is easy to adjust and, if you’re keen to do your bit to finish the house, is a not too difficult DIY job.
The British Standard for flexible paving is BS 7533 wherein you will find detailed instructions on how to go about the work in Part 2. Beginning at the bottom, the thickness of the sub base will depend upon the quality of the sub soil something that can vary considerably. Each soil type has a rating on the California Bearing Ratio (CBR) with low CBR’s indicating poor, clay soils and high, sandy gravel. If the CBR is low then a compacted depth of 200mm ofType 1 Roadbase material (crushed rock, frost free)
will be required, falling to 100mm for a high CBR.On top of this sand is compacted in to a depth of 50mm with a screed board drawn across it to leave a smooth and level surface ready for your artwork with the pavers. Remember to use a string line to help you to keep straight lines and use a diamond tipped saw when cutting to give a clean edge.A 2-5mm gap should be left between each paver.
The paving should be finished with very dry fine sand over the top, and the compacting process repeated several times. As with driveways, edge restraints and good drainage should also be built in.The best laid pavements and paths are made, not in heaven, but by attention to detail and not being in too much of a hurry. Some points to note are:
- Jointing sand should be free flowing and very dry.
- Use jointing sand that does not stain the surface of the flags or
pavers and so spoil their look. - Joint filling with sand should be done on the same day as laying
or before bad weather.
For concrete paving where cars are used don’t under specify the base or depth of filling.
Designer Detail
There are five basic bond patterns for paths which can be made different again by using borders and edgings.Note that not all paver types can be used for every design and neither can you interchange bricks from flat to on edge or end as this would leave
a very uneven surface.
Running bond: it is important to relate the direction of the pattern to the overall design.Curves and straight lines should be carefully set out and kept using lines and squares as guides as wiggles and bulges will spoil the overall appearance.
Stack bond: the pattern runs in two directions and depends on straight lines. It cannot be used on curves. Sort the pavers before you start to make sure you have enough of the same dimensions or trim to fit, otherwise you will lose the consistency of the pattern. Alternatively, use a slightly wider joint between them.
Herringbone: doesn’t follow any particular direction and can sometimes help to make a paved area look bigger. Watch out for the alignment going off course.You can’t put curves into the pattern but it works well around and set next to curved or free
form areas.
Basket weave: can be quite stiff and sometimes makes the area appear smaller.As with stack bond, you may need to do some sorting.
Curved & circular: skill and care in setting out curved patterns is essential. Suitable curved units are available from some manufacturers.
![]()
A Perfect Finish
Cutting is time consuming and involves wastage, both of which add to the cost.
Edges and manhole covers can disrupt the pattern of paving and need to be located and designed with some care. Try to set them close to the centre of an area of paving, align with the pattern where possible and try not to have them cutting across different finishes, patterns or colours. You can paint the top to match the paving, or use a recessed manhole cover to minimise the impact and lay specially cut matching thin pavers over the top bedded in thin bed adhesive rather than normal mortar. If the paving is on a rigid base, except in very small paved areas,movement joints should be made where manhole covers abut the pavers, Steps should be made from frost resistant bricks or flags. You may need to build retaining walls to keep the supporting ground in place and remember to match the dimensions of your bricks etc. to step length and riser height to give an even appearance.
Patios
For an area that is almost the most expensive, (driveways tend to take the lion’s share of the budget), and certainly most used by everyone, the patio deserves a lot more care and consideration than it usually gets.The obvious spot from the inside – on the other side of French windows or patio doors – is not necessarily the best for shade/sun,wind/shelter, view/privacy and using. Too often convenience means compromising on these essential elements that will determine success of failure in outdoor living.
The sun (when we see it!) is perhaps the main consideration. The angle at the time of day, glare from its rays striking the house walls (and remember that plants in shallow containers will dry out quickly too) should all be thought through when choosing your
area and orientation.Using existing hedges,walls or fences to provide shelter reduces cost; if you need to plant more, remember to allow space for this.
Who is going to use the patio and what for? The answer will guide your choice of finish with a smooth hard and even surface popular for younger people to play on, whilst gravel chips are good for securing tables and softening the fall of china and glasses.
Location, location, location! The closer a patio is to the house the more used it will be.A patio at a distance from the house works best as a specialist area such as an ornamental garden or water feature perhaps. Proximity to the house means: security – you don’t need to lock doors, convenience – forgotten your phone/sunglasses? it’s a few short steps to get them, privacy – it’s less easy for upstairs windows and neighbours to overlook, and finally, access to others inside the house although this may not be a plus point when you have come out for much needed R&R.
Design of the patio should take account of existing aspects of the garden such as contours and slopes, plantings, entrances and the style of the house itself, in addition to all those points about sunshine and surfaces already mentioned. In design terms, a patio is the link between the house and the garden. The shape should also relate to the style of the house,materials being used – stone, brick, flags etc. and the function of the patio as well, remembering to allow for doors to open and the location of piping, as well as large shading trees.The design should encourage rain and water run off, so it’s best to begin the process using a piece of squared paper with all the features accurately drawn and cut out models for plants, tables, benches etc.Remember that built in brick benches and barbecues take up less space and don’t need to be repainted and stored away in winter! Seek expert advice before you start, you won’t be able to move them once the mortar has set. The space doesn’t have to be rectangular, you can use the shape to create a feature in itself.A final word on steps. These are safest when built protruding from the raised area, rather than being set in to it (people can fall over the edge); you will need to allow for this when allocating the space.
A patio will carry less weight than a driveway so it’s quite possible to create one very simply by laying paving on a 50mm compacted sand bedding, providing that the sub grade is firm and well drained.However, it is always best to include a sub base. If the ground is not good, there are specialist companies who have equipment suitable, (and more cost effective), for excavating small areas and able to gain access through entrances normally too tight for site machinery.