Certified passive house consultant Patrick McMullan of Co Tyrone shares how he went about designing and building his family home.
In this article we cover:
- Full costings, spec and floorplans
- Initial design and getting the space right
- Passive house effect on the design
- Cost savers
- Kitchen and bathroom designs
- Designing the outside space
- Passive house explainers
- Choosing external finishes
- Choosing windows and doors
- Securing planning permission
- Heating system choice
- Ventilation system choice
- Provisions for on site electricity, water
- On site tips to make the home well insulated and airtight
- Getting organised before work starts
- How foundations, walls, roof and windows and doors were built
- Plastering details and floor insulation
- Insulating ducting and pipes
- Construction drawings
- Timeline and progress photos
Contents
Part 1 – Design stage – Skip to Part 1
Part 2 – Getting the house weathertight – Skip to Part 2
Floor plans, specification & suppliers – Skip here
Part 1 – Design stage
The site we are building on is located in the countryside, on the family farm in Co Tyrone, which falls under the jurisdiction of Mid-Ulster District Council. It was always my intention to move back home and build close to my family, but what really motivated my wife and I to take the plunge was the need for more space.
House size: 250 sqm
Bedrooms: 4
Plot size: 2 acres
Site cost: gifted
Build cost: £250k
Construction: masonry cavity wall
Ventilation: centralised mechanical with heat recovery
Heating system: air to water

We had our third child last April and are fast outgrowing our current three bed semi detached house in a local town. Although prices across the board have risen quite considerably in the past number of years, we wanted the kids to grow up in the countryside, so we felt it was the right time to build.
We were extremely lucky to have been gifted the site which was a huge help. To be honest if we had to buy the site before we started the build we quite literally couldn’t have afforded to do it, so we realise we are in a very privileged position.
Getting the space right
The starting point for the style of house was a range of different ideas. Thankfully we have lived in a house with the kids for a few years which gave a great insight into things we would like which we don’t currently have or where more room would be a huge help. Had we built this house five years
ago before the children were born, I dread to think what monstrosity we would have come up with. It would have been a random mix of modern ideas from social media which just wouldn’t have been
practical and would have been expensive to build and maintain.
The aesthetic appearance of the house was very important to us, but the main criteria was that it be a
functional, low energy home that would be cheap to run and make the most of the space we had.
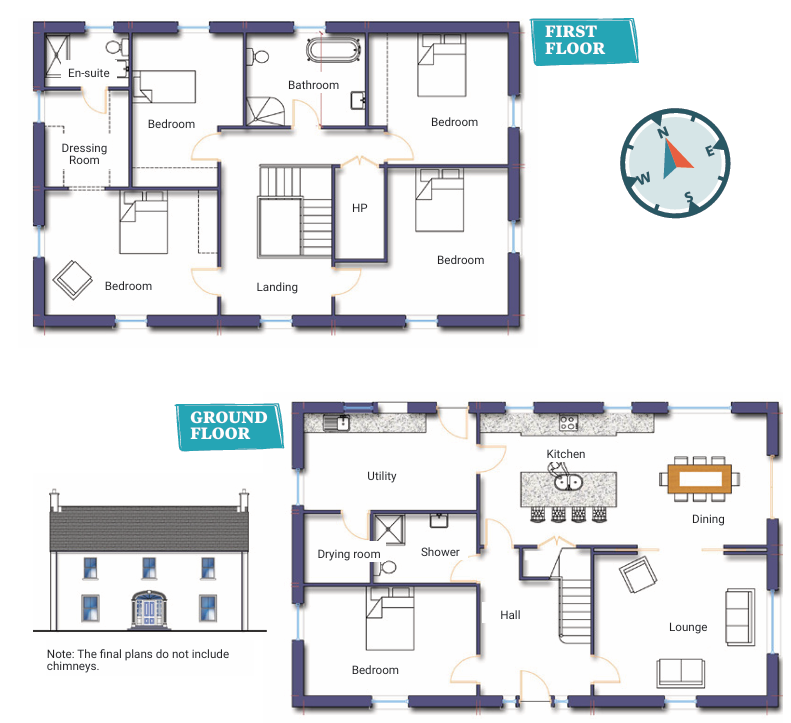
Upstairs we wanted four good sized bedrooms so the children could eventually have a room each and in the main bedroom we incorporated a walk-in dressing room and ensuite.
At this design phase we spent 90 per cent of our time planning the layout downstairs as there were so
many possible variations for everything. We only spent around 10 per cent of the time on the upstairs design as it more or less took care of itself. We tried where possible to keep the bedroom glazing on the west side of the build to avoid the morning sunrise.
Passive house effect on the design
I am a certified passive house consultant so was keen to keep the form factor as low as possible. So, the simpler the shape the easier it would be to hit the required metrics in terms of airtightness and U-values (see explainers).
Thankfully this played nicely into the style of house we wanted, as we both like the two storey modern/ Georgian farmhouse style. This style of house allowed us to make the most use of space as we had no irregular shapes to design around.
We wanted a nice open plan kitchen and living area as we tend to spend most of our time in these rooms. This meant orientating the kitchen to the south side of the build and incorporating slightly more glazing to take advantage of views and solar gains. We also really liked the idea of a larder to reduce clutter and keep the main kitchen area simple.
We decided to use the space under the stairs for a walk-in larder as it was likely to finish up just being a wasted space otherwise.
We also went with no back hall to make the utility room larger and used the extra space to incorporate a drying room within the utility. We stacked the wet rooms (toilets/showers, etc.) and kept them all to the north/ east of the build. This helps with the waste pipe returns and with the mechanical ventilation with heat recovery (MVHR) system efficiency as all the extract rooms are on one side of the house and the supply rooms on the other.
It also meant less protrusions through the exterior walls which helps keep the building airtight. This design means that there is no protrusion on the front or either gable wall which we felt was very important for the aesthetics. In total there are only two pipe protrusions on the entire house as the majority of the smaller waste pipes were joined inside the house within the suspended ceilings. We also went with a multipurprose room downstairs which for now will be a toy room for the kids but may be converted to a bedroom sometime in the future if required.
Cost savers
Budgeting on a self-build can be difficult because it’s a moving target – things change throughout the build. The biggest cost saving we have made, and it is massively underestimated, is by keeping the shape of the house simple. We essentially have a rectangular box with a straight truss roof and no chimneys. We have saved thousands on materials and labour in this regard and have got a more spacious, energy efficient home.
A very modern build with irregular shapes, bay windows, flat roofs, chimneys and lots of glazing would have cost considerably more and it also would have looked out of step with the countryside surroundings.
Due to this saving, we felt we could spend more on the interior which is why we have chosen to go with the higher end suppliers in terms of the kitchen, stairs and MVHR.
We have also been able to save money by getting several quotes from different suppliers and keeping them competitive against each other.
There are also several jobs which we have done ourselves particularly in relation to the airtightness which can deliver a good saving.
It’s very likely we will have to make some tougher decisions later in the build when it comes to bathrooms, tiles, flooring and furniture, and we will have to look at the more budget friendly options for them.
Kitchen and bathroom design
The kitchen was one of the easier choices on this build as we both wanted our kitchen to come from a local company that has a reputation in the Tyrone area for producing high end handmade kitchens. It was important for us as it’s a room we are going to spend the majority of our time in as a family, and when we visited their showroom we were sold straight away.
In fact, they were our first port of call when we got planning approved. We actually spoke to our kitchen designer before we spoke to our architect as we knew it was going to be the centrepiece of the entire house, so we basically got the kitchen we wanted and then designed the rest of the house around it.
I would recommend speaking with your kitchen designer alongside the architect at the very early stages of the design process as it’s such an important room in any house to get right.
As we are going for a very simple, uncluttered design with no stove or chimneys in the open plan kitchen/living area the room could look quite empty, so we really wanted the kitchen itself to be the standout feature of the entire house and give it the ‘wow’ factor. The kitchen designers gave us some really good ideas of simple features to add to really make it stand out, such as a bulkhead feature surrounding the entire room with upstand strip lighting and coving incorporated. For a small bit of additional cost it really gives the room a huge lift.
The bathroom choices at this stage are still up in the air. We have spoken to some local companies and looked at importing from Poland but haven’t fully settled on anything yet. Broadly speaking we haven’t focused as much on our bathrooms as they aren’t as high on our list of priorities.
Whereas in our kitchen/ living and utilities we have been meticulous in the details we want, we would be happy with almost any type and style of bathroom.
Designing the outside space
The outside space was at the forefront of our thoughts and was probably the second most important consideration for us after the kitchen/living area.
We really wanted the house to be absorbed into the existing landscape as we like the look of livestock grazing in the fields around the house, which is why we chose to go for no gardens at the front or sides.
We plan to only have an artificial grass area out the back so the kids can play on it all year round. From experience in our current house, the kids can only play in the garden a few months a year when it is dry. And they also bring a lot of muck and dirt back into the house which we wanted to avoid.
This option will be very low maintenance and we hope to offset the cost of this artificial grass by the fact we won’t have to buy any equipment to maintain natural grass (lawnmowers/strimmers/hedge cutters, etc.) which can be costly and time consuming.
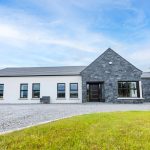
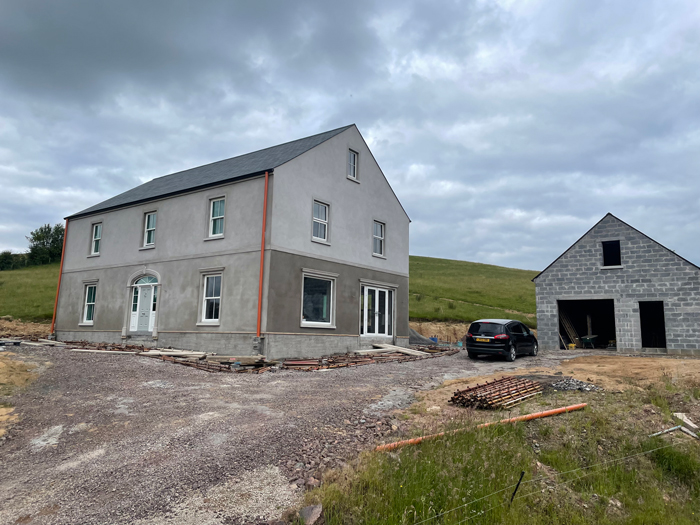
Choosing external finishes
We deliberated for weeks over the external finishes and eventually settled for a sand and cement rubbed up finish. We both really like the look of a low maintenance acrylic render when it is freshly applied, in white. But we have seen too many examples where it gets really badly discoloured over time and turns green and black, which was off putting particularly as we are surrounded by trees and shrubs.
We also looked at a dashed finish as it would help to hide any hairline cracks which might appear but didn’t think it would suit the style of the house. We will eventually paint the house, but for now the grey sand and cement finish looks good and it also feels a little more like a blank canvas. It gives us time to choose the right colour.
Choosing windows and doors
The windows and doors were a relatively simple choice in terms of the supplier as the company we chose has a great reputation in the Tyrone area with excellent after sales support which was very important to us.
I was keen to go with triple glazed casement windows to keep with the passive house principles, but my wife really liked the sliding sash windows which only come in double glazed, so it was a trade-off between performance and aesthetics.
We eventually went with the double-glazed sliding sash as we felt that aesthetically it went with the house style better, and we were happy to take a slight hit on the U-value and airtightness.
We also knew that the windows would be expertly fitted and have also been told that a well fitted double glazed window will outperform a badly fitted triple glazed window.
To make up for a slight performance drop with the windows we decided to go for a composite door over the conventional uPVC as it had a better thermal efficiency and U-value.
We also tried to maximise south side glazing for solar gain, but we also wanted to try and keep some symmetry between the two gables. So, like many of the decisions it was a three-way trade-off between performance, cost and aesthetics.
Securing planning permission
Planning permission in this case was relatively straightforward as there were favourable factors which helped the site get approved. We applied under policy CTY 10 ‘Dwelling on a Farm’ as we knew we met the criteria for this policy. The house is visually linked to an existing farm building, and it has a very mature hedgerow fully surrounding it which meant it was an ideal site for absorbing a new dwelling.
There was also an existing laneway and excellent visibility splays in both directions from the entrance, so it ticked a lot of the required boxes. Our architect submitted the planning application on our behalf and dealt with the entire process which all ran very smoothly. The entire process took around six months from the initial application.
In NI, if your house is under 250sqm there is a fixed Building Control inspection fee of £238. If you go over that value even slightly, the inspection can rise massively into the thousands so it’s an important thing to consider when applying for planning permission.
Heating system choice
We went with a 12kW heat pump and underfloor heating on both the ground and first floor. The company supplying the heat pump sized this system for us, and although it is slightly oversized it has a variable control feature. This means that if it only requires 2kW, that’s the energy consumption it will use as apposed to coming on and off with the full 12kW blast.
It also means that the heat pump will never be running at its maximum capacity which will help with the lifespan of the compressor unit.
We have also installed photovoltaic (PV) panels on the south facing garage roof to complement the heat pump. The solar panels generate electricity, which is what the heat pump runs off. We also opted for the upgraded inverter which can incorporate battery storage.

At this point, purely from a cost perspective, we didn’t add the battery storage, but it’s nice to know the system is futureproofed and can be added down the line.
We always wanted the house to be ecofriendly and we are hoping that with high levels of insulation and good airtightness that it will be an economical way to heat the house also.
The other option we looked at was an oil boiler with radiators spread throughout the house. This didn’t appeal to us as we felt the heat pump in conjunction with the MVHR system would give us the best comfort levels.
There were lots of different heat pump options and to be honest they all were very good, but we got a recommendation from a friend who had installed this type of heat pump in their new build and that swayed us to go with that option.
We also looked at possibly upping the size of the hot water cylinder to 500 litres to take advantage of the solar panels in the summer, but we felt what you would gain in the summer you would lose in the winter with the bigger tank, so we eventually settled for a 300 litre tank. We used the rough calculation of 50 litres of water per person to size the cylinder.
Ventilation system choice
This was a choice we deliberated on quite a bit. We were always going to install a full MVHR unit as opposed to positive input ventilation (PIV) units but there was so much choice, it took time to get our heads around it. There were some budget friendly options, but we decided to spend a little more and go with one with additional features which we felt justified the uplift in cost.
The main thing we liked was the built-in preheater with frost protection. And the fact that it was self balancing. We had spoken to other friends who had installed MVHRs who were happy that they were getting clean fresh air but they said the temperature of the air was too low.
My advice in this area would be to double check that you have some kind of pre-heater/frost protection on the intake as otherwise on cold nights in winter your system will either not work at all or will be exhausting warm air and taking in much colder air.
For example, if your house is heated to 20degC in winter and the outside air temperature is zero degrees, with the MVHR running at 75 per cent efficiency it still means that the supply air is coming in at 15degC. That would be noticeably uncomfortable. With a preheater on the intake, the supply air gets a boost before it goes through the MVHR unit.
Provisions for on site electricity, water
I would recommend taking time to think of where the connections for electricity and water will go as it can add considerable cost if you must install transformers and several electricity poles. With the water connection also, we have heard some horror stories of sites being a longdistance from a connection point and ultimately having a massive drop in water pressure by the time the water reaches the site.
We have just recently got our electricity connected and bar the initial upfront cost of a new connection the rest of the process has been straightforward. From the moment we made the payment to NIE Networks, we had about a 10-week turnaround time to installation.
We were lucky that we had an existing transformer and pole just less than 200m from the site, so we didn’t require any additional infrastructure and we were able to run he cable underground. As the cable was running through agricultural land it had to be buried 1100mm deep which meant a little extra work on the excavation and back fill as the standard trench depth is usually 550mm. Thankfully my family owned the agricultural land we were digging through so there was no issue with permission or access. The water connection was made with NI Water and again the process was straightforward with a reasonably quick turnaround time. We had a new connection point about 100m from the site which means we have good water pressure.
Construction drawings
The more information you can bring to you architect at this stage the better as you can make more informed choices about the layout and style if you know what you want from the start.
Our construction drawings took some time and there were several revisions from the initial draft. We were lucky to have a good architect who was happy to listen to what we wanted and make suggestions and improvements.
We also took the initial construction drawings to several of the key people who would be working on the job such as the kitchen designer, MVHR designer, tradesmen, plumber and electrician.
They all were able to make slight changes and improvements and it was worthwhile speaking to as many people as possible at this stage as they all had good suggestions.
Explainers
Form factor: The relationship between the external surface area (A) and the internal Treated Floor Area (TFA). Achieving a heat loss form factor of less than three is a rule of thumb when designing passive house homes.
Compact building (low A/V ratio): A low external surface area (A) to internal volume (V) ratio – less than 0.7sqm/ m3 – will result in a more energy efficient build, i.e. one with a low heating demand.
U-value: A measure of how effective a material is as an insulator. The lower the U-value the better.
Airtightness: A measure of how many air leakages a building contains.
PIV: Mechanical ventilation system that pumps fresh air into the home, usually to a central location, to create a pressure differential that pushes out stale air through gaps in the fabric and trickle vents.
MVHR: Centralised mechanical ventilation system that mechanically extracts stale air and replaces it with filtered fresh air that’s been prewarmed (by the heat gathered from extracting stale air).
Part 2 – Getting the house weathertight
In part two of his self-build diary, Patrick McMullan explains how he got on after breaking ground, with a special focus on making the home well insulated and airtight.
House size: 250 sqm
Bedrooms: 4
Plot size: 2 acres
Site cost: gifted
Build cost: £250k
Construction: masonry cavity wall
Ventilation: centralised mechanical with heat recovery
Heating system: air to water heat pump
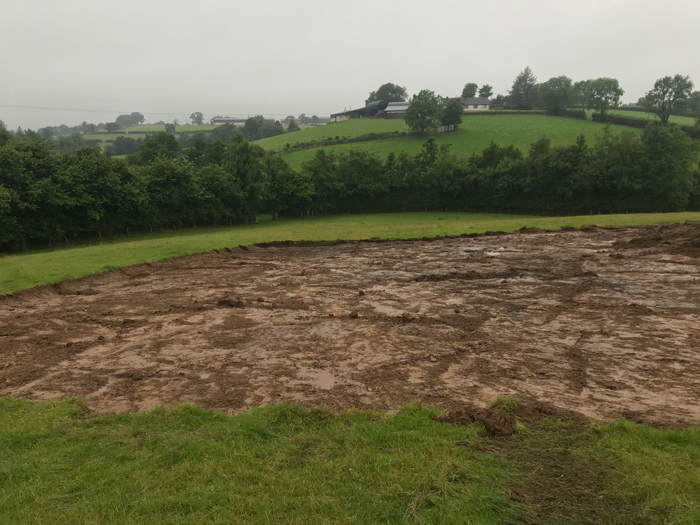
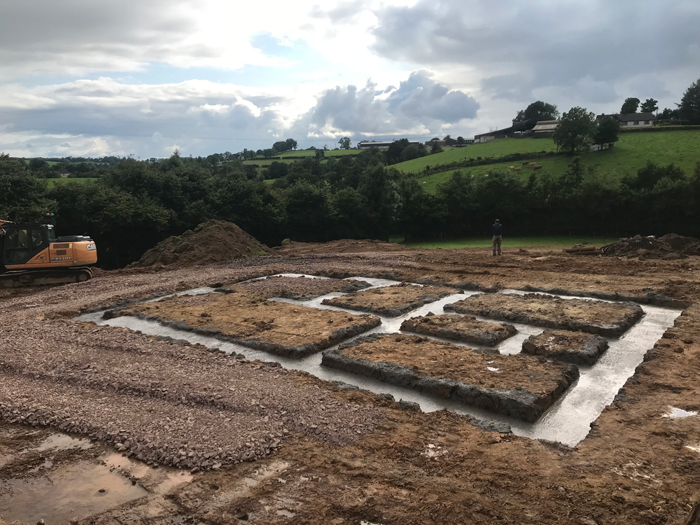
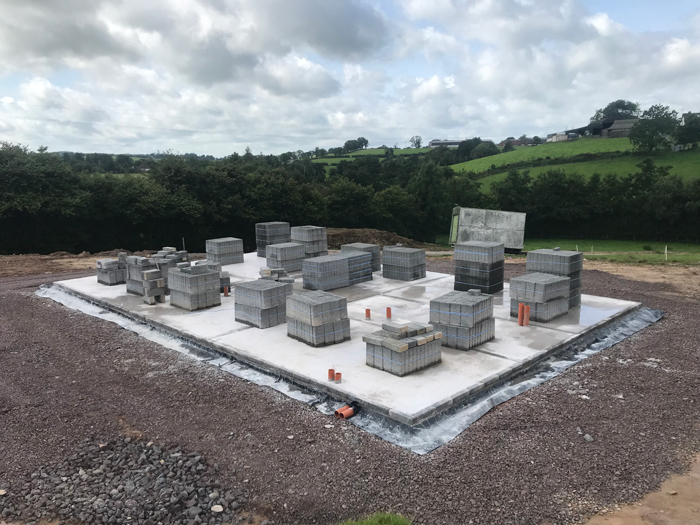
We started on site on the 18th July 2023. Thankfully, it was a relatively smooth process. The first reason it went well is that we had a topographical survey completed by a land surveyor prior to our planning approval. This was useful in making decisions about the house location, boundaries, and the design of the drainage system.
We were lucky in that breaking ground coincided with a spell of lovely summer weather, so it made it easy for the groundwork contractor to get tractors, diggers and dumpers across the dry agricultural land to begin site clearance.
The site entrance was an existing agricultural entrance which had excellent visibility splays in both directions and it also had a partially stoned lane which helped speed up the entire process.
I had an account with a local quarry so was able to get whatever stone (4-inch crusher run) the contractor required to complete the lane.
Getting organised
I set up an account with the local builder’s merchant which was extremely useful to the tradesmen as they could get materials without delay. Due to the volume of materials being ordered, the builder’s merchant agreed to deliver for free.
I bought an old skip which we used to organise the waste materials, nearly all of which could be recycled. This meant we saved on landfill costs.
We then set up a temporary site office from an old container which we used mainly for storage of materials but also included A1 copies of all the architect’s working drawings which was useful for tradesmen on site. It meant that all materials and drawings were protected from the elements and could be locked securely at night.
We also installed a camera on site which helped to remotely monitor activities and provided some form of security. The mature roadside hedge and long lane meant security wasn’t a big issue.
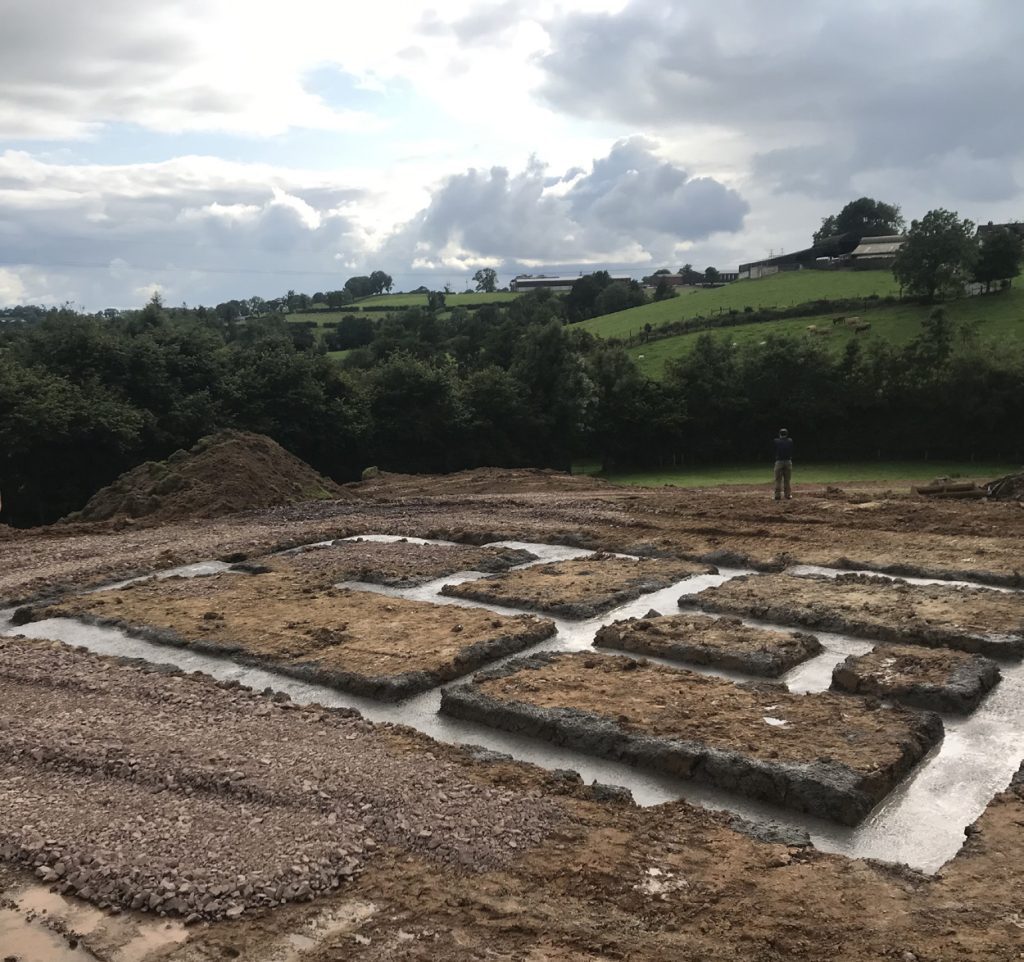
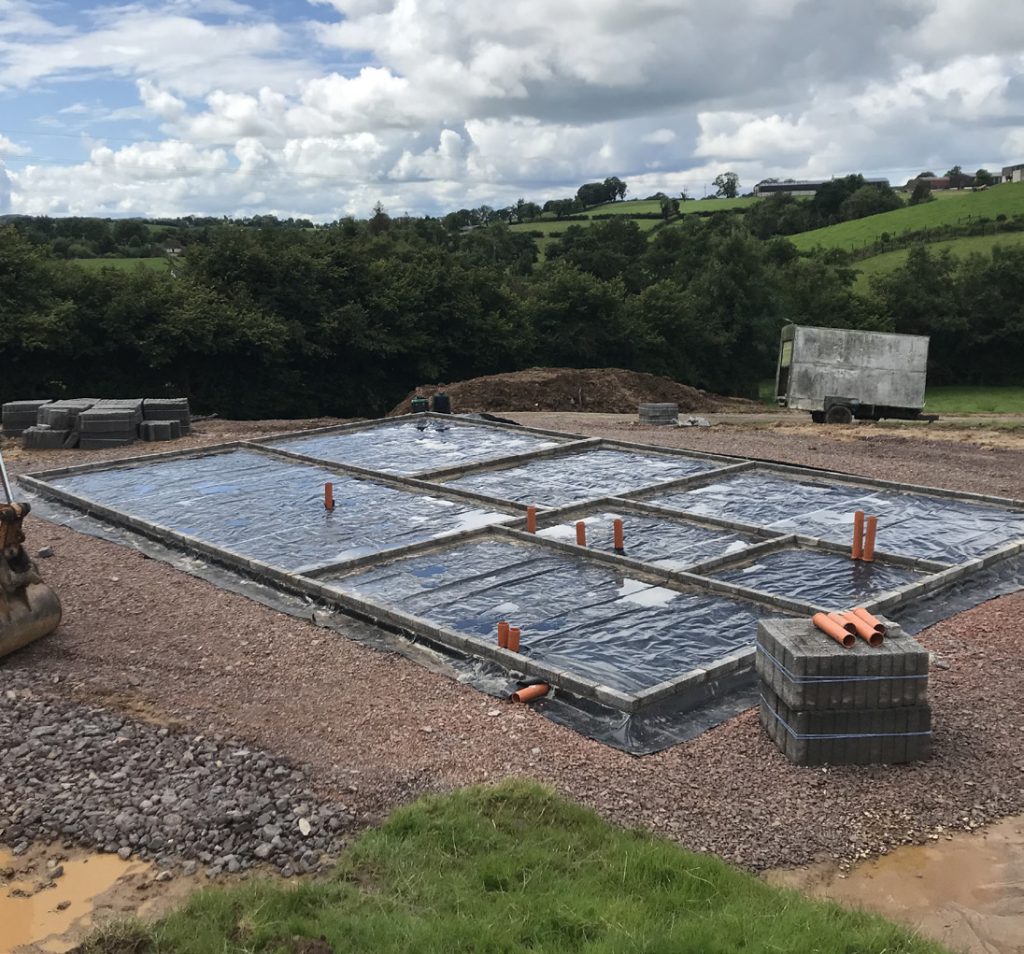
Foundations
After the plot was stripped, I had a civil engineer come out to mark out the foundations and take levels. As the site was relatively flat and the soil had a good bearing capacity we used a shallow strip foundation.
Our contractor, builder and engineer were all local and had worked together on projects before, so they were able to complete the foundations, build the footings and pour the subfloor relatively quickly.
It was a huge advantage to use local tradesmen who were familiar with each other as they worked together and were willing to improvise to fix any small issues on site without any assistance.
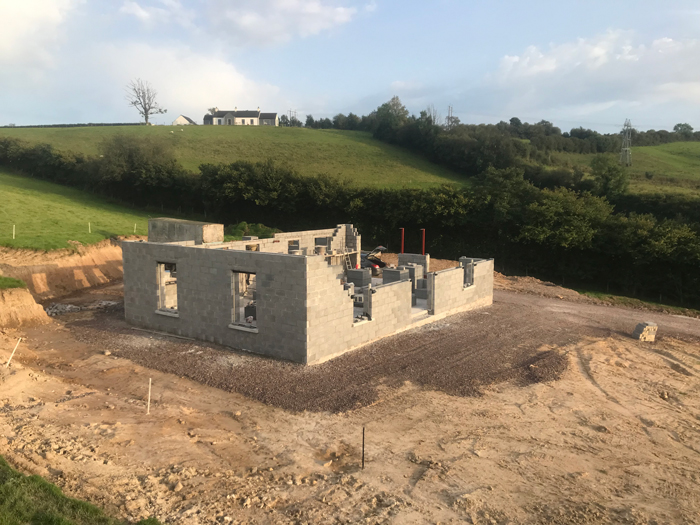
Wall construction
At the design stage, we had initially looked at an ICF (insulating concrete formwork) building method, which had its advantages in terms of a fast build speed and giving a high performance building envelope.
However, with the high initial cost coupled with the lack of familiarity in the building trade we just didn’t feel comfortable with this method. Similarly with timber frame construction. It again would have the advantage of increased build speed with reduced labour and waste on site but personally it felt like it would require more maintenance over its lifespan and would be less stable than masonry.
We were happy to settle with the tried and tested method of masonry cavity wall construction. Primarily this was due to the familiarity within the industry, which meant we had several options in terms of the labour and materials.
We also knew there would be almost no maintenance considerations, and it would provide good structural strength and durability. The added bonus from a passive house perspective is that it would provide a good thermal mass to the building which will help moderate indoor temperatures by stabilising temperature fluctuations, reducing the need for heating and cooling, and improving overall comfort.
The actual building of the blockwork was very standard practice. We went for a 200mm full fill cavity to achieve the required U-value for the walls.
A few small tweaks we made to incorporate passive principles was to use an insulated block on the inner leaf for the first course of block from the subfloor. This creates a thermal break from the foundation to the internal wall which stops the heat from inside going down into the foundation and conversely stops the cold from outside entering up through the floor.
Roof
We went for a truss roof with no chimneys and finished it with a Brazilian slate. Due to the simplicity of the house shape, we saved on both material and labour costs. As a rough estimate, I calculated we saved around £8,000 in materials alone by having no chimneys and a simple pitched roof. It meant we didn’t need any lead, flues, fascia, soffit, and there were no slates needed to be cut when being installed which was a big saving.
The two guys who slated the roof, a straight gable-to-gable run, completed the house and garage in just two days. As well as saving on costs we found having no chimneys, rooflights or bay windows also helped with the airtightness of the building envelope, so it was a win-win scenario.
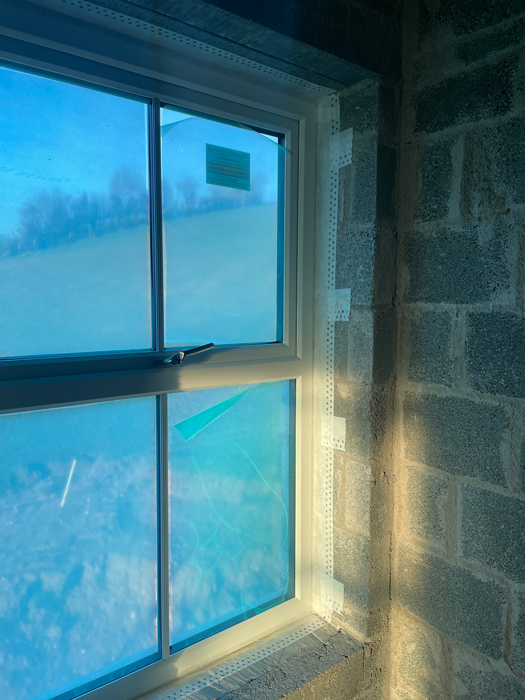
Window and door openings
The next stage was to prepare the window openings for the window installation. Even though we went with a well renowned, high quality window installer I still felt it necessary to apply a light plaster screed around the window openings for two reasons.
Firstly, its closed off the exposed blockwork around the frame which helps with airtightness, and it meant that we would have a perfectly flat surface to apply the airtight tape to after installation.
Having spoken to numerous people in the industry over the years, almost unequivocally they say the biggest gain achievable in terms of airtightness in the home is to tape the windows and doors after installation.
Even though these window/ door reveals will be plastered afterwards, which is also an airtight coating, very often cracks or gaps will appear around the frame as the house dries out, which can have a huge effect on how effective that airtightness barrier is.
This can lead to draughts around windows/doors which will make the house uncomfortable and prone to temperature fluctuations. It’s definitely worth doing even if you are not trying to achieve the passive house standard.
We used airtightness paint on door openings that were close to the external wall prior to internal doorframes being installed, as this is another weak link. If the door frames are installed without this preparation, then the frames would be fixed to exposed blockwork, which wouldn’t be good practice.

Cavity wall insulation
At this point prior to any internal plastering, we pumped in the EPS (expanded polystyrene) beads into the cavity. We went with a 200mm cavity to achieve the required U-values of 0.15W/sqmK for the passive house standard.
This pumped insulation technique was very appealing due to its speed and the size of the cavity to fill, it also meant there would be no waste and it also eliminates thermal looping which can be very common with built in cavity insulation boards.
The wall is drilled at specific points and the beads are mixed with glue and pumped in under pressure. The cavity will still be able to breathe; the bead will not absorb water and will not allow the transfer of water across the cavity to the inner leaf.
We had extra holes drilled under windows and the entire top row of blocks were drilled to ensure that the cavity would have no voids and be totally filled. We worked with a local company who has an excellent reputation in this area, and we were very pleased with the level of workmanship.
We never liked the idea of built in insulation boards for the cavity, because it is incredibly difficult to install correctly. A gap of just 10mm has been proven to double the heat loss, which is known as thermal bypass.
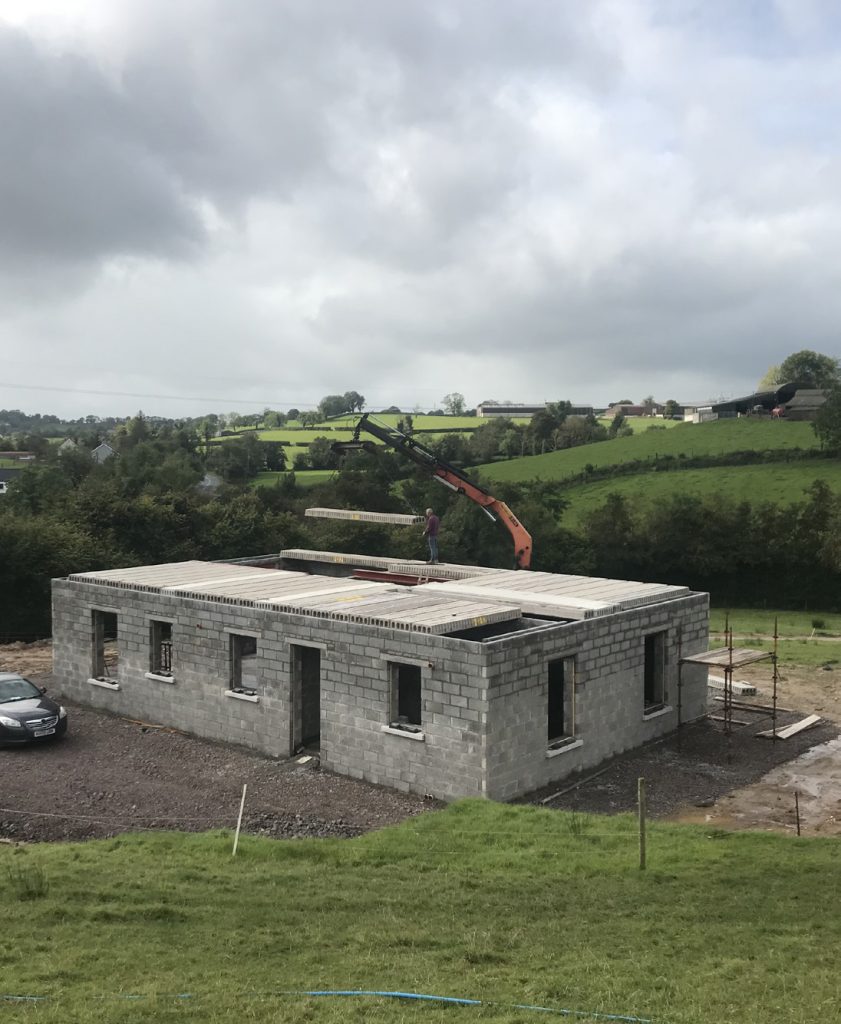
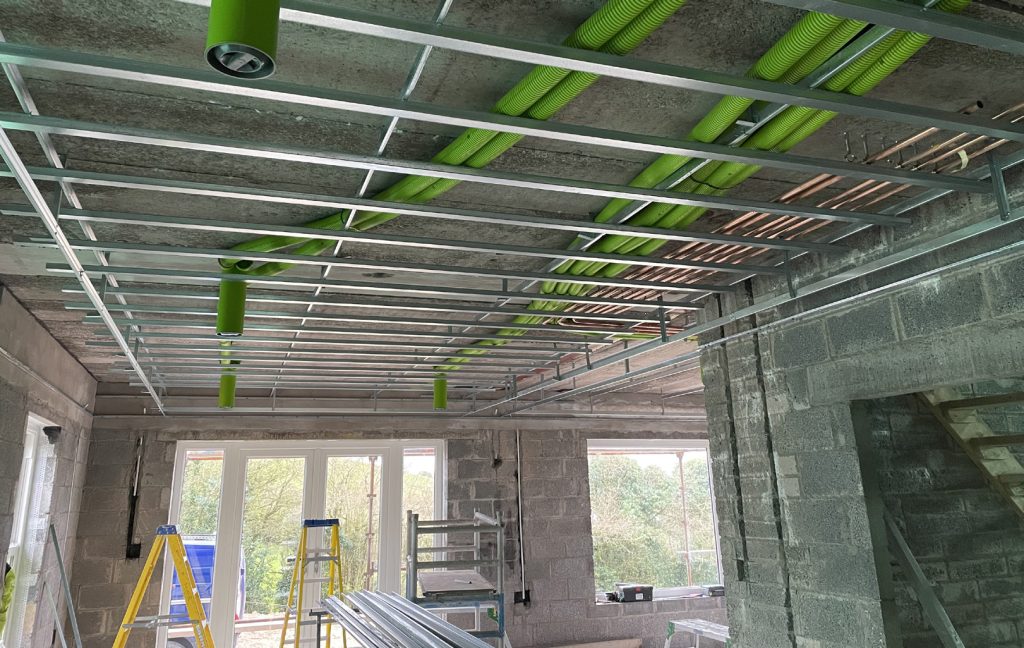
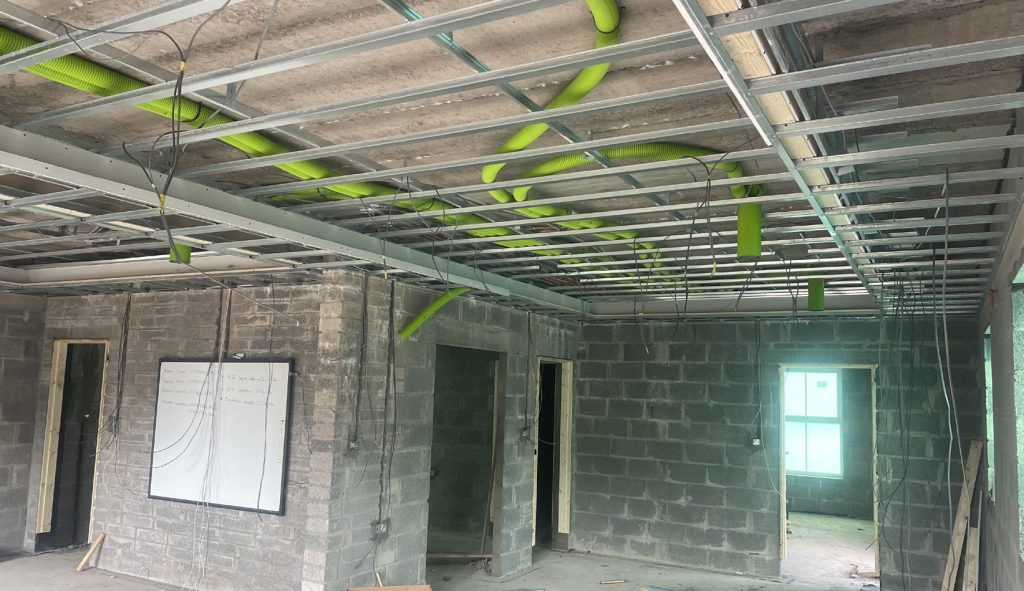
Ceilings
We are building a two-storey home and chose hollowcore precast slabs to build the first floor, mainly for its soundproofing quality. It is very important for the airtightness of the building envelope that the ends of the slabs on the external walls are wrapped with an airtight membrane.
This means that there is no break in the airtight envelope from the ground floor to the first floor which means it follows the ‘pencil rule’ which is one of the key aspects of passive house.
If the ends of the slabs aren’t wrapped, the airtight envelope stops at the underside of the walls down 200mm from the precast slab with a sand and cement plaster. This means that even when the suspended metal ceiling is installed, the void between the slab and the ceiling will still be airtight and means that there is no break in the building envelope.
This could also have been done with airtight paint, which is probably more common, but we had a plasterer on site at fully airtight with render and then insulated, which will help to retain the heat within the building envelope.
If this detail is missed, it can be extremely expensive and time consuming to retrospectively amend – especially if plasterboard or even rendered ceilings have already been completed. It’s important to have this scheduled in at the right time.
The next job to complete was the installation of the airtight membrane on the first floor ceiling. As mentioned previously our attic is a cold space so our airtight envelope stops at ceiling height.
We worked predominantly with a specific brand of airtightness products for its excellent reputation and for being readily available in local builders’ merchants. To try and achieve maximum airtightness and avoid even staple holes in the membrane, we used double sided tape on the underside of the joists and stuck the membrane up. This worked well.
It’s very important to tape any protrusions through the membrane such as electrical wires, vents, spotlights, etc. to ensure maximum airtightness is achieved. We then taped the edges of the membrane to the masonry wall to complete the airtight envelope.
This membrane will ensure that there will be no movement of air/heat through the ceiling into the cold attic space, even if some hairline cracks appear over time in the plastered wall and ceilings.
We then moved on to insulating the upstairs ceiling with 50mm PIR board below and 150mm of fiberglass insulation above which meant we achieved the 0.15W/sqmK passive house U-value standard.
We chose to go with PIR board and plasterboard separately as opposed to insulated plasterboard for a few reasons.
The main benefit to taking this approach is that you can tape the insulation joints separately and you can also overlap the joints with each plasterboard sheet to give a more airtight finish, as opposed to butting insulated plasterboard sheets together which can leave gaps.
There is also much less waste with this method and although the labour costs increase, the material cost is cheaper, so overall it is more efficient financially and performance wise to install them separately.
We tried to use as few fixings as possible during installation as the screws penetrate the airtight membrane above, so we taped every screw head with airtight tape afterwards.
Plastering
Another big aspect of getting the house airtight was both the internal and external plastering as the plastering coats themselves provide an airtight finish.
Internally all walls were masonry built, so we used a sand and cement base coat and finished it with a gypsum plaster. This is standard practice in most masonry builds so there are good labour and material options available.
We let this plaster cure slowly to avoid shrinkage cracks and made sure the house was well ventilated to allow the moisture to escape as the porous plaster can absorb moisture from the air which can lead to mould growth. The ceilings were bonded and finished with a gypsum plater which again is standard practice.
Externally we were keen to get render on the house to keep it air and watertight. We had looked at lots of options but eventually settled for a sand and cement scratch coat with a rubbed-up sand and cement
finish.
The house will eventually be painted but this external render leaves us with a blank canvas as we take time to decide what colours will work best.
The most important thing is that we have an excellent airtight coating on the external surface of the house as at this point in the build it was coming into autumn/winter. This render coating allows us to carry out our airtight testing, as it means all exposed leaky blockwork has been covered.
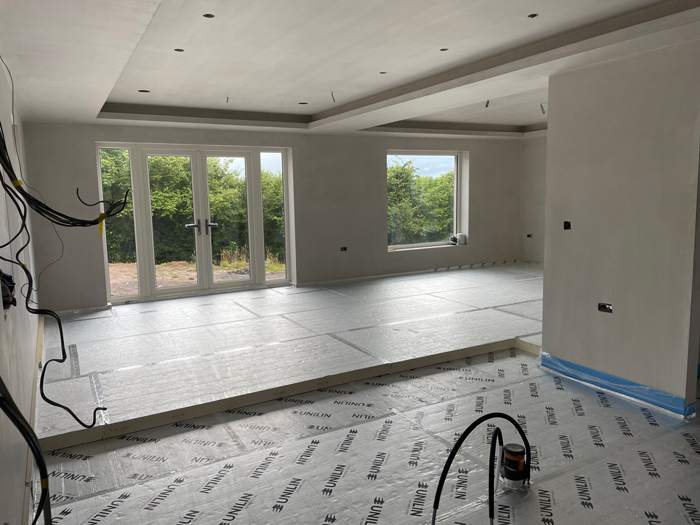
Floor insulation
We then moved on to insulating the floor. On the ground floor we went with a build-up of 50mm liquid insulated screed to cover all pipework, and then 150mm PIR board split between separate 50mm and 100mm sheets which got us the required U-value for passive house standard.
Like the ceilings, we split the PIR sheets so that we could overlap the joints. No matter how tightly fitted, a single 150mm sheet would have air gaps when butted together.
We also went with a 50mm PIR board upstand on all external walls to create a thermal break on the floor to wall junction. Our engineers report detailed that a 25mm upstand was sufficient but with such little difference in the price of 25mm and 50mm PIR board, around £2 per sheet, we felt it best to go with the 50mm.
The benefit of using the insulated liquid screed for the first 50mm is that it covered all pipework and left a perfectly level floor, so there is no cutting or levelling required on the PIR boards which improves their performance, reduces waste and speeds up installation. We taped all joints on each layer of PIR board to leave a well-sealed uniform surface.
Upstairs we went with 50mm PIR board with a 50mm upstand on the floor to wall junction. We then taped all joints with aluminium foil to make sure there was no air gaps.
If I was to do this again, I would have gone with insulated liquid screed upstairs as there were pipes to cut around which was time consuming, and reduced the performance of the PIR board. The hollowcore slabs can also be uneven when laid, so some of the floor had to be levelled with sand to prevent them from see-sawing.
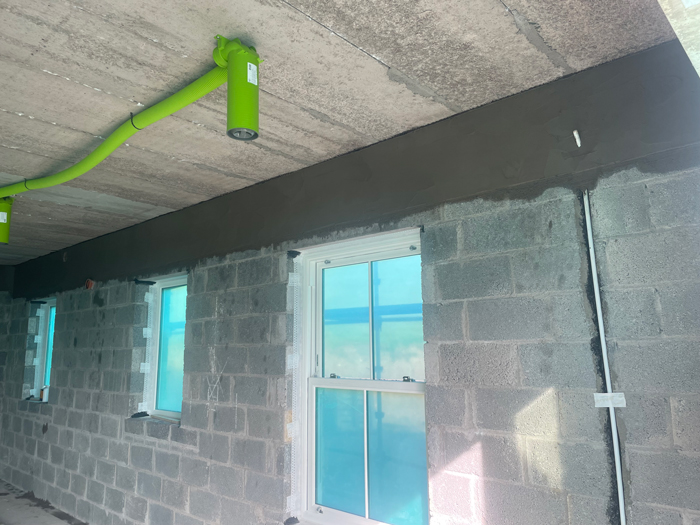
Insulating pipes and ducting
We used airtight paint on the floor to wall junction as well as in all the external wall chasings (tracking). The airtight paint is useful for difficult to reach areas or uneven surfaces.
Generally, the wall chasing will have conduit installed and then a plaster coat over the surface, but this still leaves a lot of exposed blockwork in the back of the track. This allows unwanted airflow.
It may not seem significant but if you add up the total number of metres in the entire home then it is. This can be felt very clearly in some homes where you can feel a draught around switches and plugs.
Even after the electrical wires have been installed it’s a good idea to close the end of the conduit with a silicone-based sealer as air could still flow in the conduit if it was running to an area outside the airtight envelope.
Another detail we completed was to fill all ducting voids for the MVHR with insulated beads. This is because our MVHR unit is in the attic which is outside the heated building envelope so it’s important to try and keep this as well insulated and airtight as possible. We also used airtight tape to tape the pipes to the membrane where they protrude in the attic.
Airtightness Strategy
We took a three-pronged approach to airtightness: airtight paint, airtight journey tape and sand and cement render. A key consideration is to ensure that there is no exposed blockwork as it has very poor airtightness due to it being an extremely porous material.
Explainers
Thermal looping: Constant air movement within the cavity wall due to warm air rising at one end and cool air descending at the other end, which negates the performance of the insulation.
Thermal bypass: Heat loss from a break (gap) in the insulation.
U-value: Measure by which the energy efficiency of a building element (thermal resistance) is measured; the lower the value the better.
PIR: Polyisocyanurate is a plastic insulation material that comes in board form; it’s the most common board material used in Ireland today as it strikes a balance between cost and efficiency.
EPS: Expanded Polystyrene is a plastic insulation material that comes in board form, most commonly used for floors, and in beads for cavity walls. It’s a less effective insulant (you need a thicker EPS board to achieve the same thermal resistance as a thinner PIR board) than PIR but more cost effective overall
Costings
House build cost: £100/sqft
Building concrete blocks: £3.50 per square foot plus £9,200 for builder
Windows and doors (house and garage): £19k
Attic roof trusses (house and garage): £9k
Slates (house and garage): £8k
MVHR installed: £6k
Heat pump, cylinder and underfloor kit: £9.5k
Stairs: £4.5k
200mm blown bead insulation (house only): £4.3k
Electricity connection: £6.5k
Water connection: £1.2k
Electrical work: £9k
Cork Plaster
Even though it’s more expensive, Patrick chose cork plaster instead of traditional gypsum as it improves the thermal performance of a wall and allows it to breathe and balance room humidity which prevents condensation and mould. It’s also up to 10 times more elastic than traditional plasters reducing the risk of cracks and helps reduce thermal bridges.
Spec
Walls: 200mm cavity walls pumped with EPS beads, cork lime plaster on window reveals, U-value 0.17W/sqmK
Roof: 200mm rockwool between joists, 50mm insulated plasterboard below, U-value 0.12W/sqmK
Floor: 50mm insulated liquid screed to cover pipework, 100mm PIR board 50mm liquid screed on top (200mm total), U-value 0.15W/sqmK
Windows: timber sliding sash double glazed, overall U-value 1.4W/sqmK