


Methods of construction and roofing your timber frame extension
This is the second article in a series of four, designed to highlight potential problems and guide you through the process of building an extension, where there are surrounding properties. This article gives you an overview of some of the methods of construction and roofing that you should consider.
Planning Permission: If your proposed house extension falls within the 40sq.m Planning Permission exemption limit (ROI), there are a number of factors to be aware of relating to the construction and roofing. (Note that existing extensions on the property count towards the 40 sq.m allowance.) If the rear wall of the house doesn’t have a gable then the height of the walls of your extension must not exceed the height of the rear wall of the existing house. If the rear wall of the existing house has a gable, then the new walls of the extension must not exceed the height of the rear existing wall, excluding any gable being built as part of your extension. In the case of a flat roof extension, the height of the highest point of the roof must not exceed the parapet or eaves of the existing roof. In NI you are allowed to extend your house by up to 70mcu or 15% of the original house volume, whichever is the greater, if it is detached or semi-detached. Note: size is calculated from external measurements and there is an upper limit of 115mcu. The cubic area of any existing extension built since 1973 is taken into account. If an extension would fall within 5m of an existing building belonging to the house, such as a garage, that building will be treated as if it were part of the extension to create a combined volume. If your house is terraced, listed or in a Conservation Area, you can only extend by 50mcu or one tenth of the original house volume, whichever is the greater. Also, with regard to the maximum height allowed for a wall or fence along a road which doesn’t need planning consent this is 1m (NI) and 1.2m (ROI). Subscription Offer: Don’t miss an issue and receive a NEW magazine every 3 months. This is a recurring subscription €4.50/£3.90 every quarter with FREE Postage (UK & Ireland Only). Opt out at any time you wish…
SUBSCRIBE TODAY
In NI, listed Buildings and houses in Conservation Areas, all additional buildings which are more than 50mcu in volume, regardless of the distance from your home, are treated as extensions and so reduce the allowance for extending without planning permission. The design and materials used to build the extension must be in keeping with your house. No part of your extension should be nearer to any road than the nearest part of the house, and the extension should not be taller than the roof. An extension should not be more than 4m high if it comes within 3m of your property boundary.
Methods of Construction
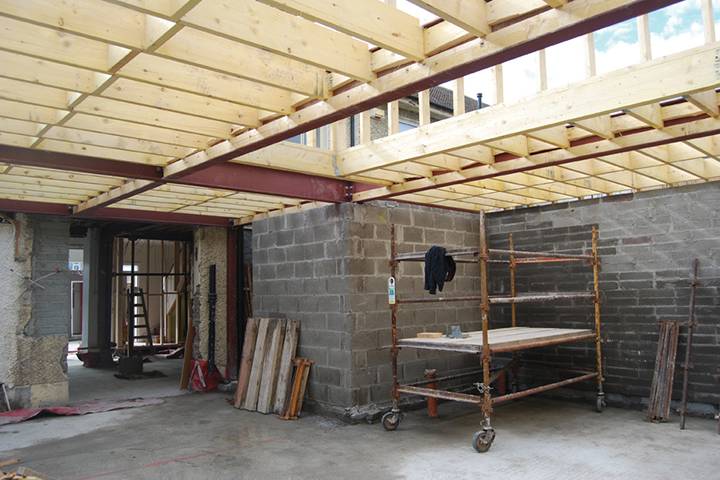
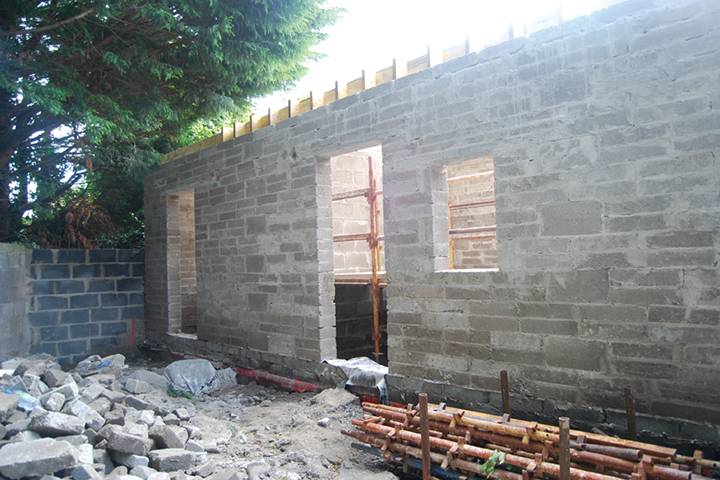
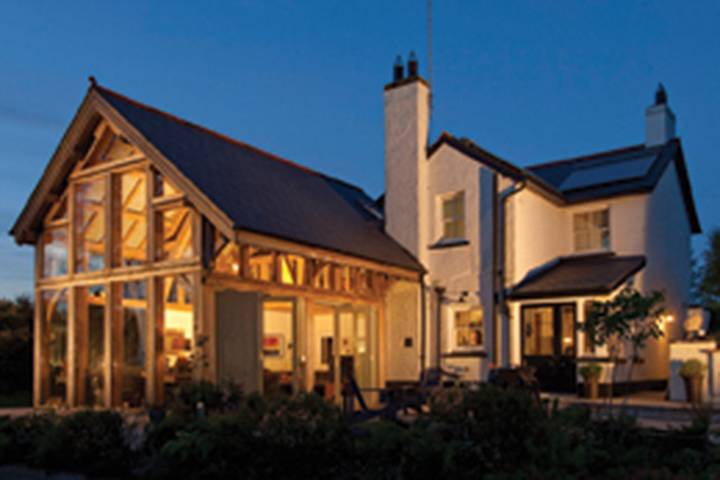
Do you have the time and skills to manage the project and perhaps even to do some of the work yourself? This may mean employing different trades for the various elements of the work, from the foundations through to the finishings. Don’t undertake it lightly. Most people will employ a builder to quote for and do the whole job for them. In any event, you will need professional drawings. If not for planning permission, then at least for Building Control purposes. Decide on your method of construction. Brick and block or block and block with an insulated cavity are traditional. However, with rapidly increasing insulation standards and better energy efficiency there are some good alternatives available. Some of them are more normally used for whole house construction, however, with the downturn in the construction industry, many of these manufacturers will quote for an extension. Timber Frame uses a timber framework as the means of structural support, with an inner wall of timber wall panels. The structure is precision engineered making it very strong and quick to build. The outer wall can be block or brick work, stone, weatherboarding, hung tiles or render laid on stainless steel mesh fixed to battens. If you wish to make a feature of the frame, exposing the timber structure, oak is normally the option with a SIP between the solid beams. This form of construction also lends itself to large glazed areas. Suitable for both walls and roofs. SIPs (structural insulated panels) are a development of timber frame whereby the panel acts as the structural support. It is a ‘sandwich’ of an osb (oriented strand board) with high density insulation in the middle. The panels are factory produced and suitable for both walls and roofs.
Advantages These are fast, efficient forms of construction with less waste as a result of factory controlled manufacturing, which also helps to ensure a quality product. There is reduced dependence on wet trades (block/brick/plaster work). SIPs in particular are highly energy efficient and less prone to air leakage.
Disadvantages Typically there are long lead times for design and engineering and you may find that there is a lack of both suitably qualified contractors and following trades with experience of working with timber frame or SIPs. Transportation and site access are crucial to gain the full advantages as this method is initially more expensive than brick or block, however, the rapid on site assembly helps to reduce the overall build cost. You will usually have to pay a deposit.
Steel frame is also prefabricated but is rarely used for domestic extensions unless there is a need for very large spans to create big internal open spaces.
SIPs (structural insulated panels) are a development of timber frame whereby the panel acts as the structural support. It is a ‘sandwich’ of an osb (oriented strand board) with high density insulation in the middle. The panels are factory produced and suitable for both walls and roofs.
Advantages These are fast, efficient forms of construction with less waste as a result of factory controlled manufacturing, which also helps to ensure a quality product. There is reduced dependence on wet trades (block/brick/plaster work). SIPs in particular are highly energy efficient and less prone to air leakage.
Disadvantages Typically there are long lead times for design and engineering and you may find that there is a lack of both suitably qualified contractors and following trades with experience of working with timber frame or SIPs. Transportation and site access are crucial to gain the full advantages as this method is initially more expensive than brick or block, however, the rapid on site assembly helps to reduce the overall build cost. You will usually have to pay a deposit.
Steel frame is also prefabricated but is rarely used for domestic extensions unless there is a need for very large spans to create big internal open spaces.
 Insulated concrete forms (ICF) These are hollow moulds consisting of two panels of high density polystyrene insulation tied together by high impact spacers. They interlock like Lego bricks to create structural walls or floors. The moulds are dry stacked and then pump filled with concrete, with the outer mould forming permanent insulation. Internally it can be plastered, externally it can be clad similar to timber framed construction.
Advantages There are a range of thicknesses of insulation, typically being thicker on the outer face, with the concrete acting as an excellent thermal mass and providing very high levels of thermal and acoustic insulation. It is a very quick and simple form of construction, eliminating the need for block or bricklayers. There are no internal supporting walls, leaving a clear space with the ability to alter the internal layout at any time. Design flexibility means it is particularly suitable for making curved walls.
Disadvantages The main disadvantage is cost, usually about 10% more than timber frame, but this figure varies according to the cost of concrete. In the longer term though, you save in reduced energy costs. If in the future you decide to change the size or location of a window or add a door, you will need to cut into the solid concrete wall. Equally it is very important that all service locations are carefully agreed prior to pouring the concrete. This method of construction requires specialist operatives.
Glass Very often one of the reasons for building an extension is to let more light into and through the house. A large amount of glazing is therefore important and given the popularity of this, we looked at glass box extensions in detail in our Winter 2012 issue.
Eco friendly alternatives include Hempcrete and Straw bale. Both form a breathable, insulated wall with excellent thermal mass allowing it to remain cool inside during summer but warm in winter. This creates a healthy living or work environment, but these walls are not structural and require support (usually timber). The external finish is often of clay or lime based plasters. As non standard forms of construction, you will require a specialist or you may attend courses teaching you the skills.
Insulated concrete forms (ICF) These are hollow moulds consisting of two panels of high density polystyrene insulation tied together by high impact spacers. They interlock like Lego bricks to create structural walls or floors. The moulds are dry stacked and then pump filled with concrete, with the outer mould forming permanent insulation. Internally it can be plastered, externally it can be clad similar to timber framed construction.
Advantages There are a range of thicknesses of insulation, typically being thicker on the outer face, with the concrete acting as an excellent thermal mass and providing very high levels of thermal and acoustic insulation. It is a very quick and simple form of construction, eliminating the need for block or bricklayers. There are no internal supporting walls, leaving a clear space with the ability to alter the internal layout at any time. Design flexibility means it is particularly suitable for making curved walls.
Disadvantages The main disadvantage is cost, usually about 10% more than timber frame, but this figure varies according to the cost of concrete. In the longer term though, you save in reduced energy costs. If in the future you decide to change the size or location of a window or add a door, you will need to cut into the solid concrete wall. Equally it is very important that all service locations are carefully agreed prior to pouring the concrete. This method of construction requires specialist operatives.
Glass Very often one of the reasons for building an extension is to let more light into and through the house. A large amount of glazing is therefore important and given the popularity of this, we looked at glass box extensions in detail in our Winter 2012 issue.
Eco friendly alternatives include Hempcrete and Straw bale. Both form a breathable, insulated wall with excellent thermal mass allowing it to remain cool inside during summer but warm in winter. This creates a healthy living or work environment, but these walls are not structural and require support (usually timber). The external finish is often of clay or lime based plasters. As non standard forms of construction, you will require a specialist or you may attend courses teaching you the skills.
Methods of Roofing
The roof of your extension will be joined on to one of the sides of your house. The design could be flat, single or double pitched. The choice may be determined by the constraints of your existing house and other buildings around it. Flat Roof: Flat roof finishes are a good, inexpensive option, so don’t be put off by the bad press some have received in the past. Modern methods of construction and a range of new materials have created high quality flat roof finishes offering excellent performance and long life.
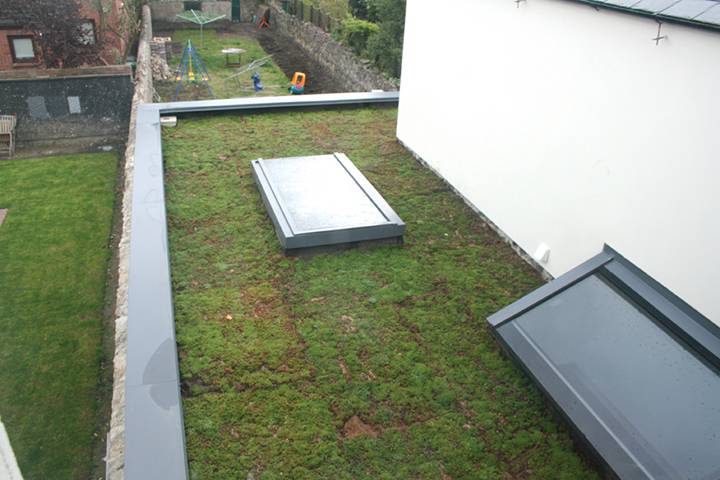
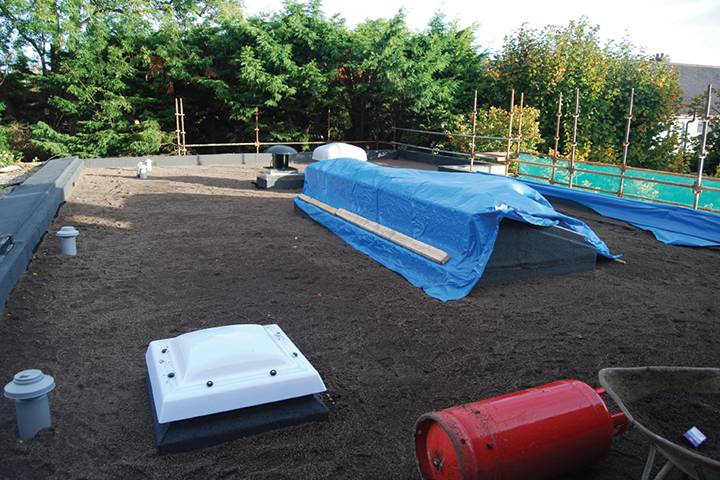
The most usual type is a single ply roof membrane which is very strong and flexible with a thickness of about 2mm. These are manufactured from a variety of materials, either thermo-plastic or thermo-set, resulting in a very long lasting product that is not as susceptible to extremes of temperature or the radiation and oxidation from sunlight. The membrane is spread across the roof surface and sealed at its joints, producing a continuous waterproof layer lasting up to 40 years without a lot of maintenance. Thermo-plastic membrane The most common is uPVC which is made flexible as a result of including plasticisers. Thermoplastic membranes can be recognised by the seams that are created at the joints as a result of either heat or chemical fixing. The seam is as strong as the membrane. The majority of thermoplastic membranes include reinforcement like fibreglass or polyester, giving them increased strength and stability. Advantages They are lightweight, quick to install and resistant to a wide variety of chemicals. It is a recyclable material which requires minimal maintenance. Disadvantages Thermoplastic membranes are a single layer and as a result will require a high quality roofing installer to ensure all seams are properly welded, otherwise they can separate. Equally penetration of the single layer will result in water entering your building. Thermo-set membranes These are created from rubber polymers, the most common being EPDM or rubber roofing. It provides protection from potentially damaging effects of sunlight and extreme changes of temperature. The material is identified by its seams which require adhesive liquid or tape creating a watertight seal at the overlaps. Advantages They provide excellent performance under dramatic weather changes. A lightweight product quick to install with a good variety of options and different levels of protection, very cost effective. Disadvantages The thin surface can be easily penetrated causing water ingress, and being merely a single layer, if not carefully installed seal problems could arise. Eco alternatives include Green roofs which can be either extensive or intensive. The former uses a low maintenance sedum blanket which is light enough to put over a timber deck flat roof. An intensive green roof is much heavier and makes an ideal roof garden. Consequently it requires a structural concrete roof deck adding to the overall costs for your works. Both provide good sound and thermal insulation. Green roofs must have a layer of waterproofing to protect the structure underneath, drainage and aeration layer to control moisture and a growing layer. The control of water is essential. The waterproofing membrane is designed to prevent water from entering the building. Roof edges, rooflights, chimneys or any roof penetrations require careful protection. If the roof is covered with vegetation the roof is further protected from solar radiation and air temperature resulting in greatly increasing the life of the roof. A green roof can last up to 50 years. Pitched roofs: your design may be for a single pitch ‘lean to’ type, or you may have room for a more traditional double pitched roof. In both cases the angle of the roof will need to be great enough to allow you to use slates, tiles or shingles. The minimum pitch is probably 22deg but each product will have its own minimum specification. A pitched roof allows you to match the slates or tiles on your existing roof, or you could go for something completely different both in type and colour. Underneath this covering, which will be fixed to tiles or battens, are various layers of either felt or breather membrane followed by a good thickness of insulation with a damp proof membrane on the inside or the ‘warm’ side of the insulation. Your designer will specify the layering. The interior may then be finished as you desire with plasterboard or decorative sheeting or cladding, assuming that you have a cathedral/pitched ceiling. If the underside is to an open roof void, then this may need to be ventilated; the damp proof membrane would not be required under the rafters and instead would be under the ceiling joists which would be liberally filled with insulation to Building Control standards or, (preferably), higher.
